Ultimate Terry Nappies Folding Guide
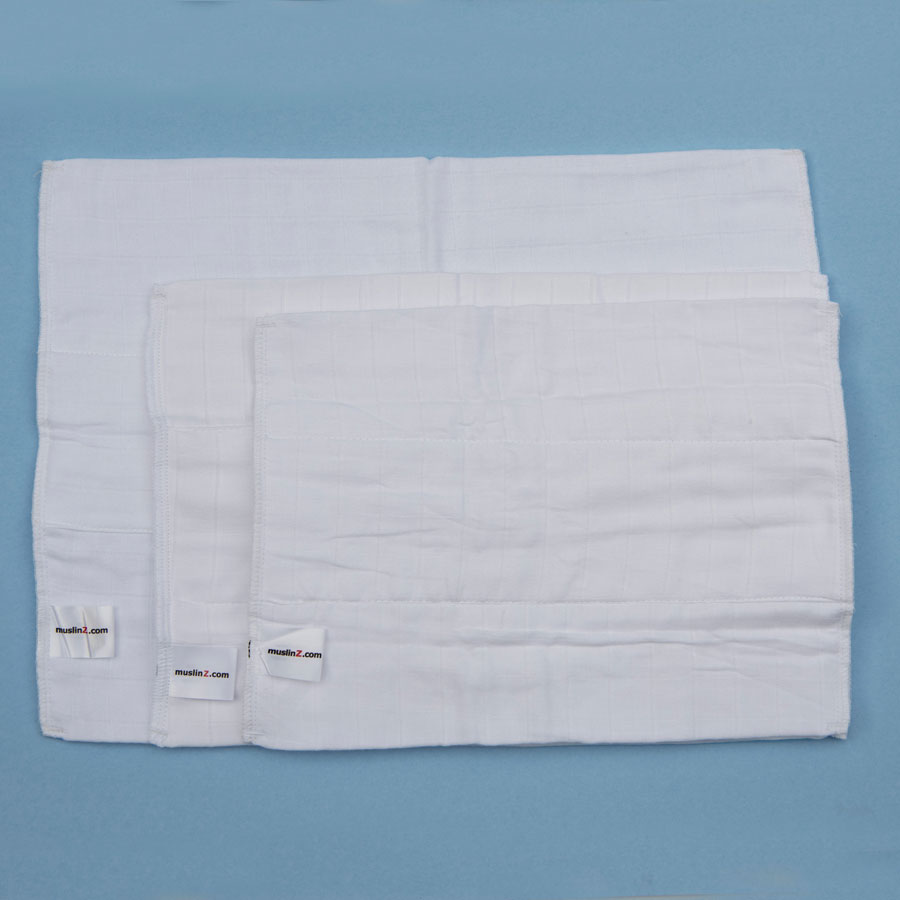
Folding Terry Squares
Here you can find a selection of the most popular terry square folds, along with step-by-step instructions, pictures and videos to show you how easy it can be to find the right fold for your baby. Check out our terry square advice pages for individual step-by-step photo guides to some of our favourite folds and for full details on article on how to use terry nappies.
Click below to go directly to any of the folds
Rolling the Legs for Better Containment
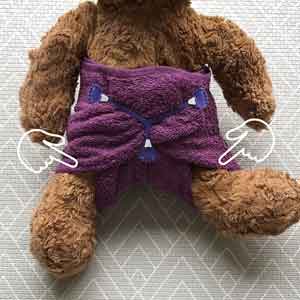
One thing that is consistent throughout all the terry square folds is how we roll the legs to aid containment. Very often when you've just put the terry on, the material around the legs may appear loose and like it's not going to stop anything coming out. This is because the material around the legs needs rolling in on itself, once this is done the terry will be a very good barrier against anything. When rolling the edges in start at the edge of the material and simply roll it in on itself so that it creates a barrier to anything trying to escape the nappy.
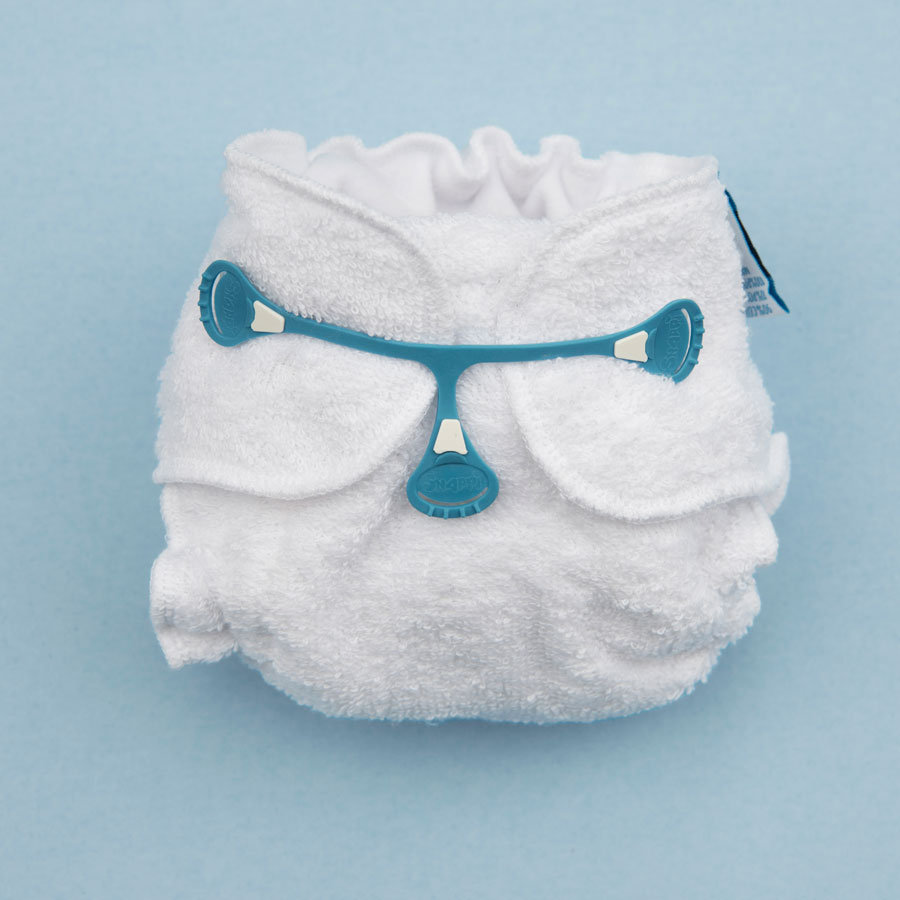
How to roll the legs in:
Terry Square Folds
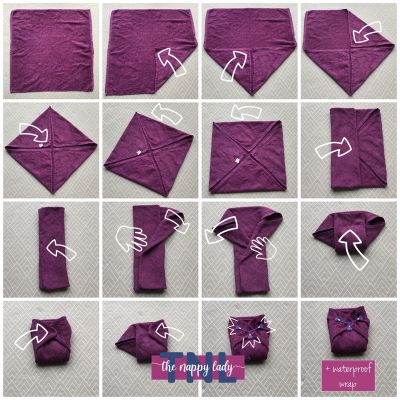
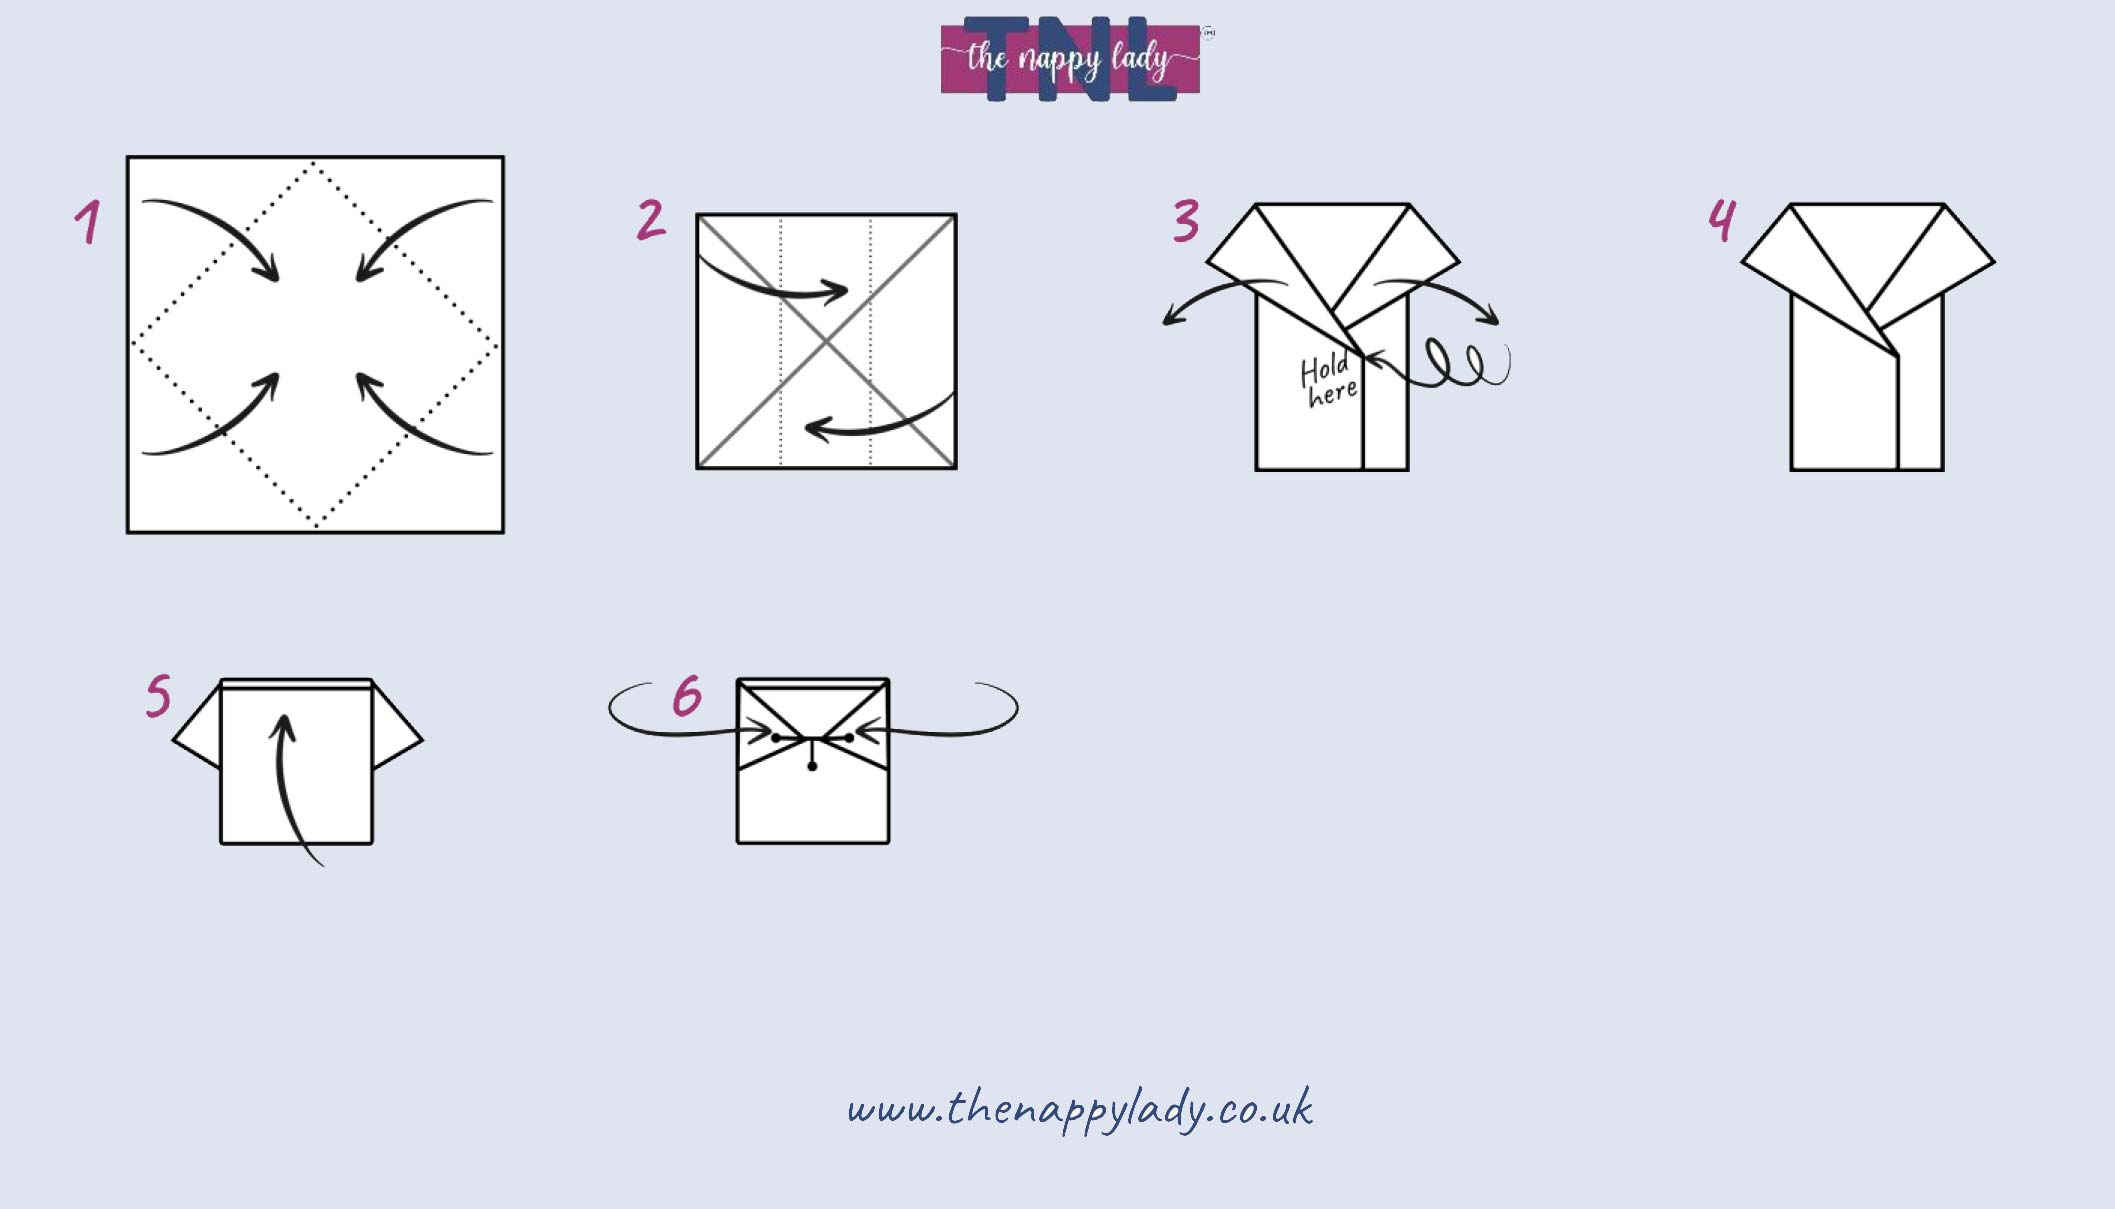
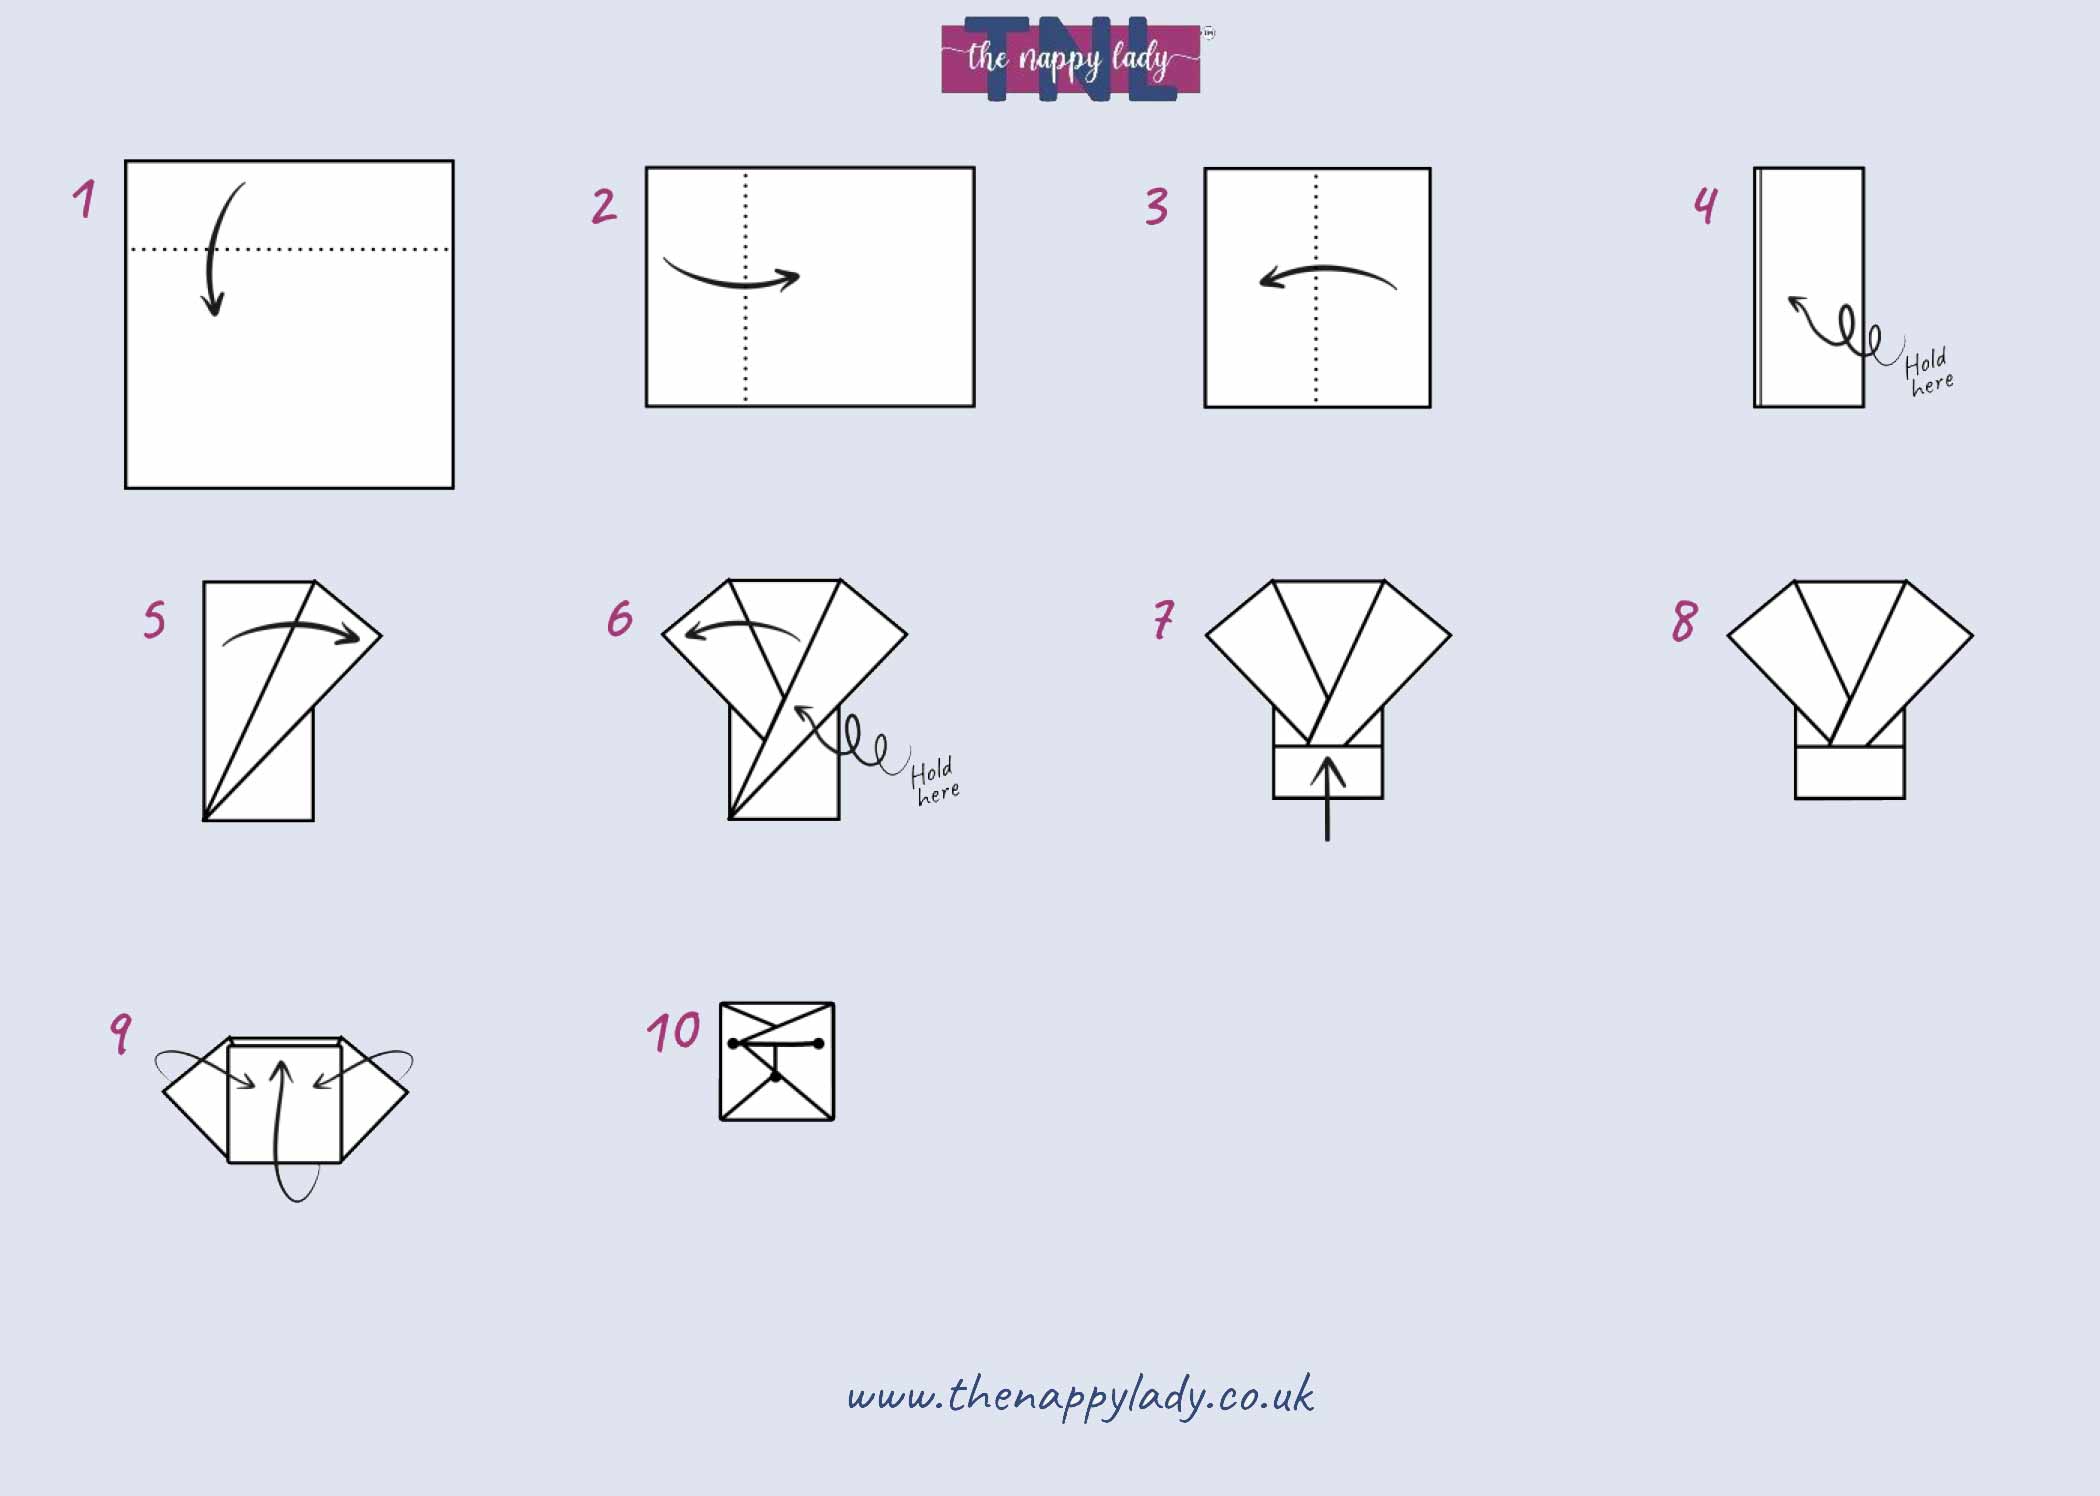
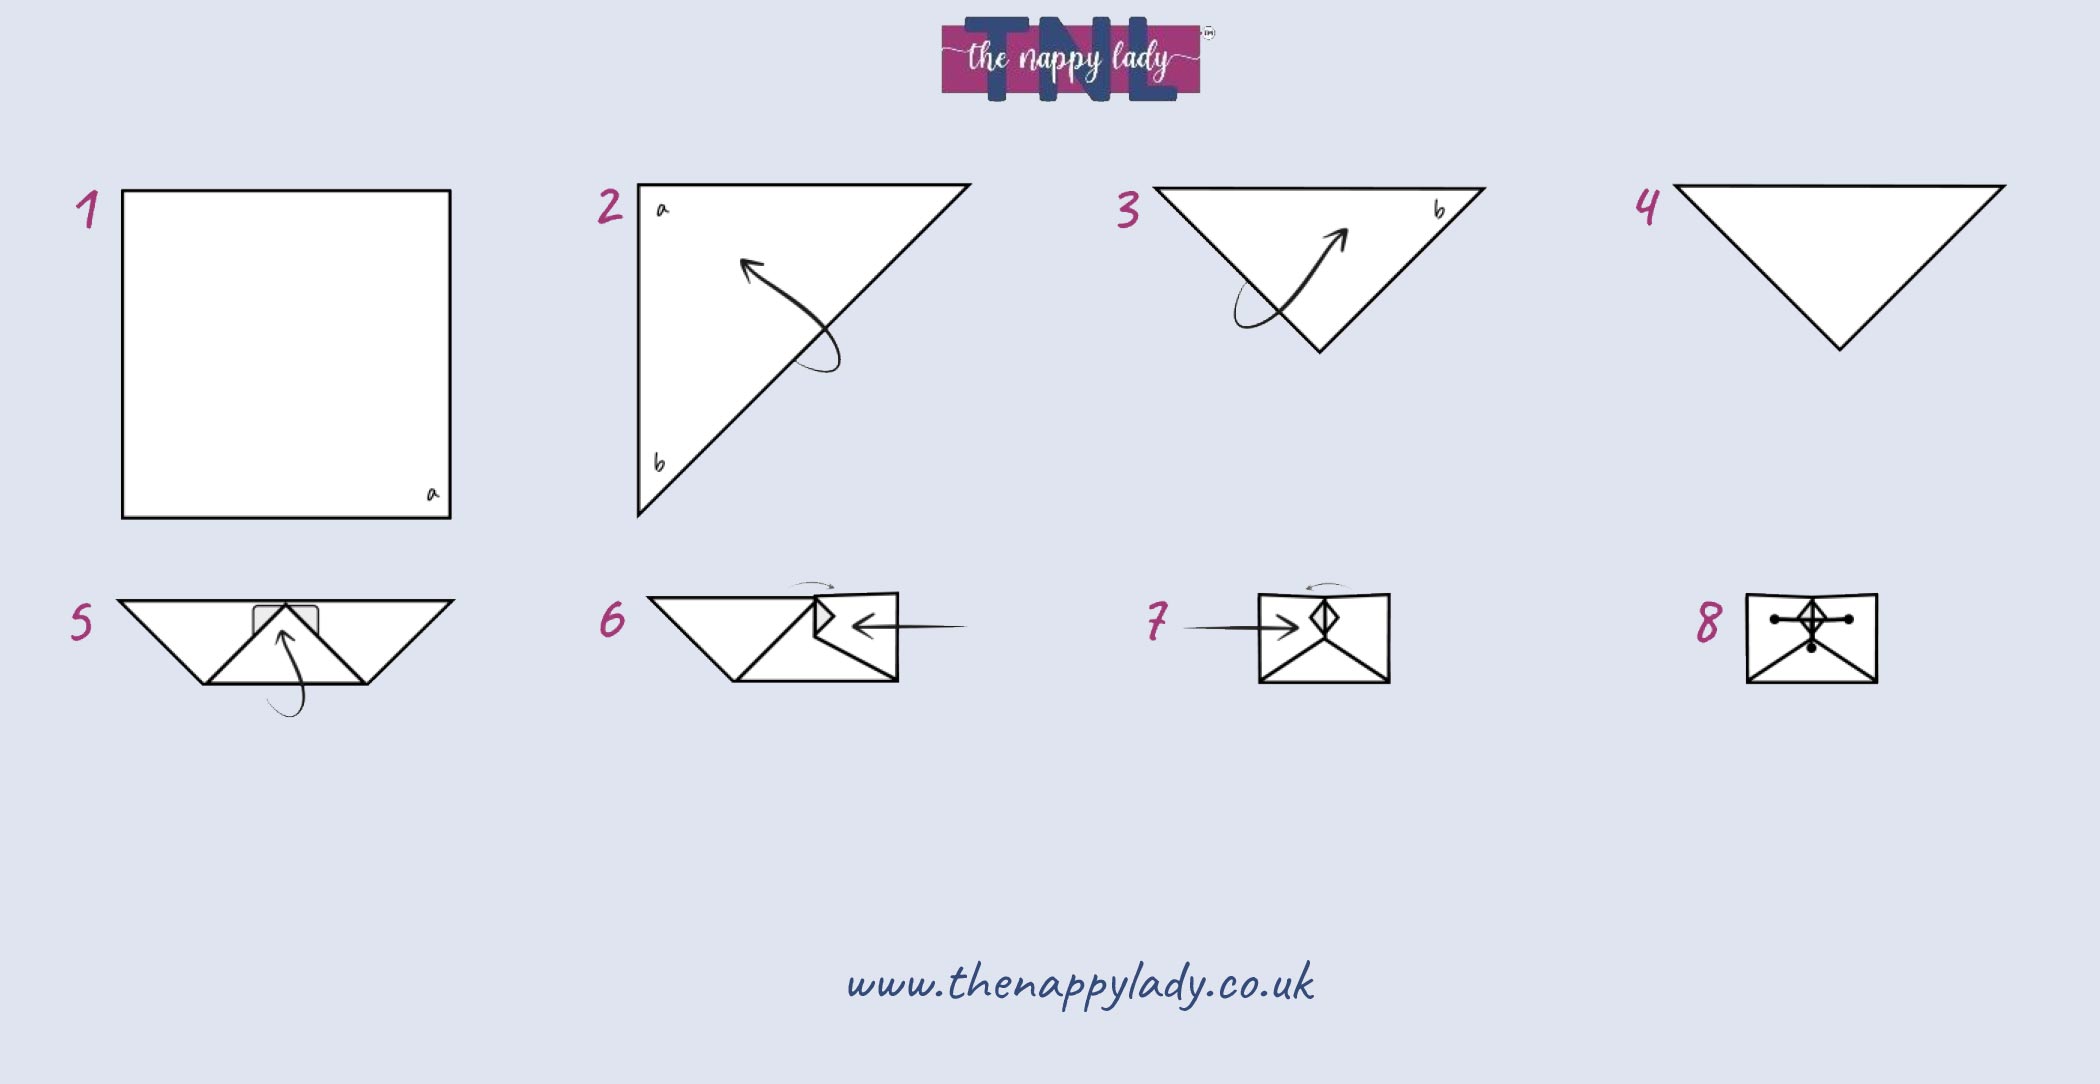
The Jo Fold for Terry Squares and Muslins
This fold enables you to put even the thickest 60cm cotton terry square on a newborn without adding too much bulk (because it spreads it so evenly). So it's an ideal fold when you only want to buy one size of flat terry. It also works fantastically with Muslins instead of terries.
- Lay the terry out in a square and then fold all four points to the centre.
- Fold each side over one third.
- Fan out the top of the nappy, holding where indicated in diagram 3.
- Add baby
- Fold up the bottom, bring each side wing around the baby and fasten with a nippa. Tuck up any excess fabric on the legs.
TNL Tip - at step 1, fold the corners further in to make the nappy smaller or not as far as the middle to make the nappy bigger.
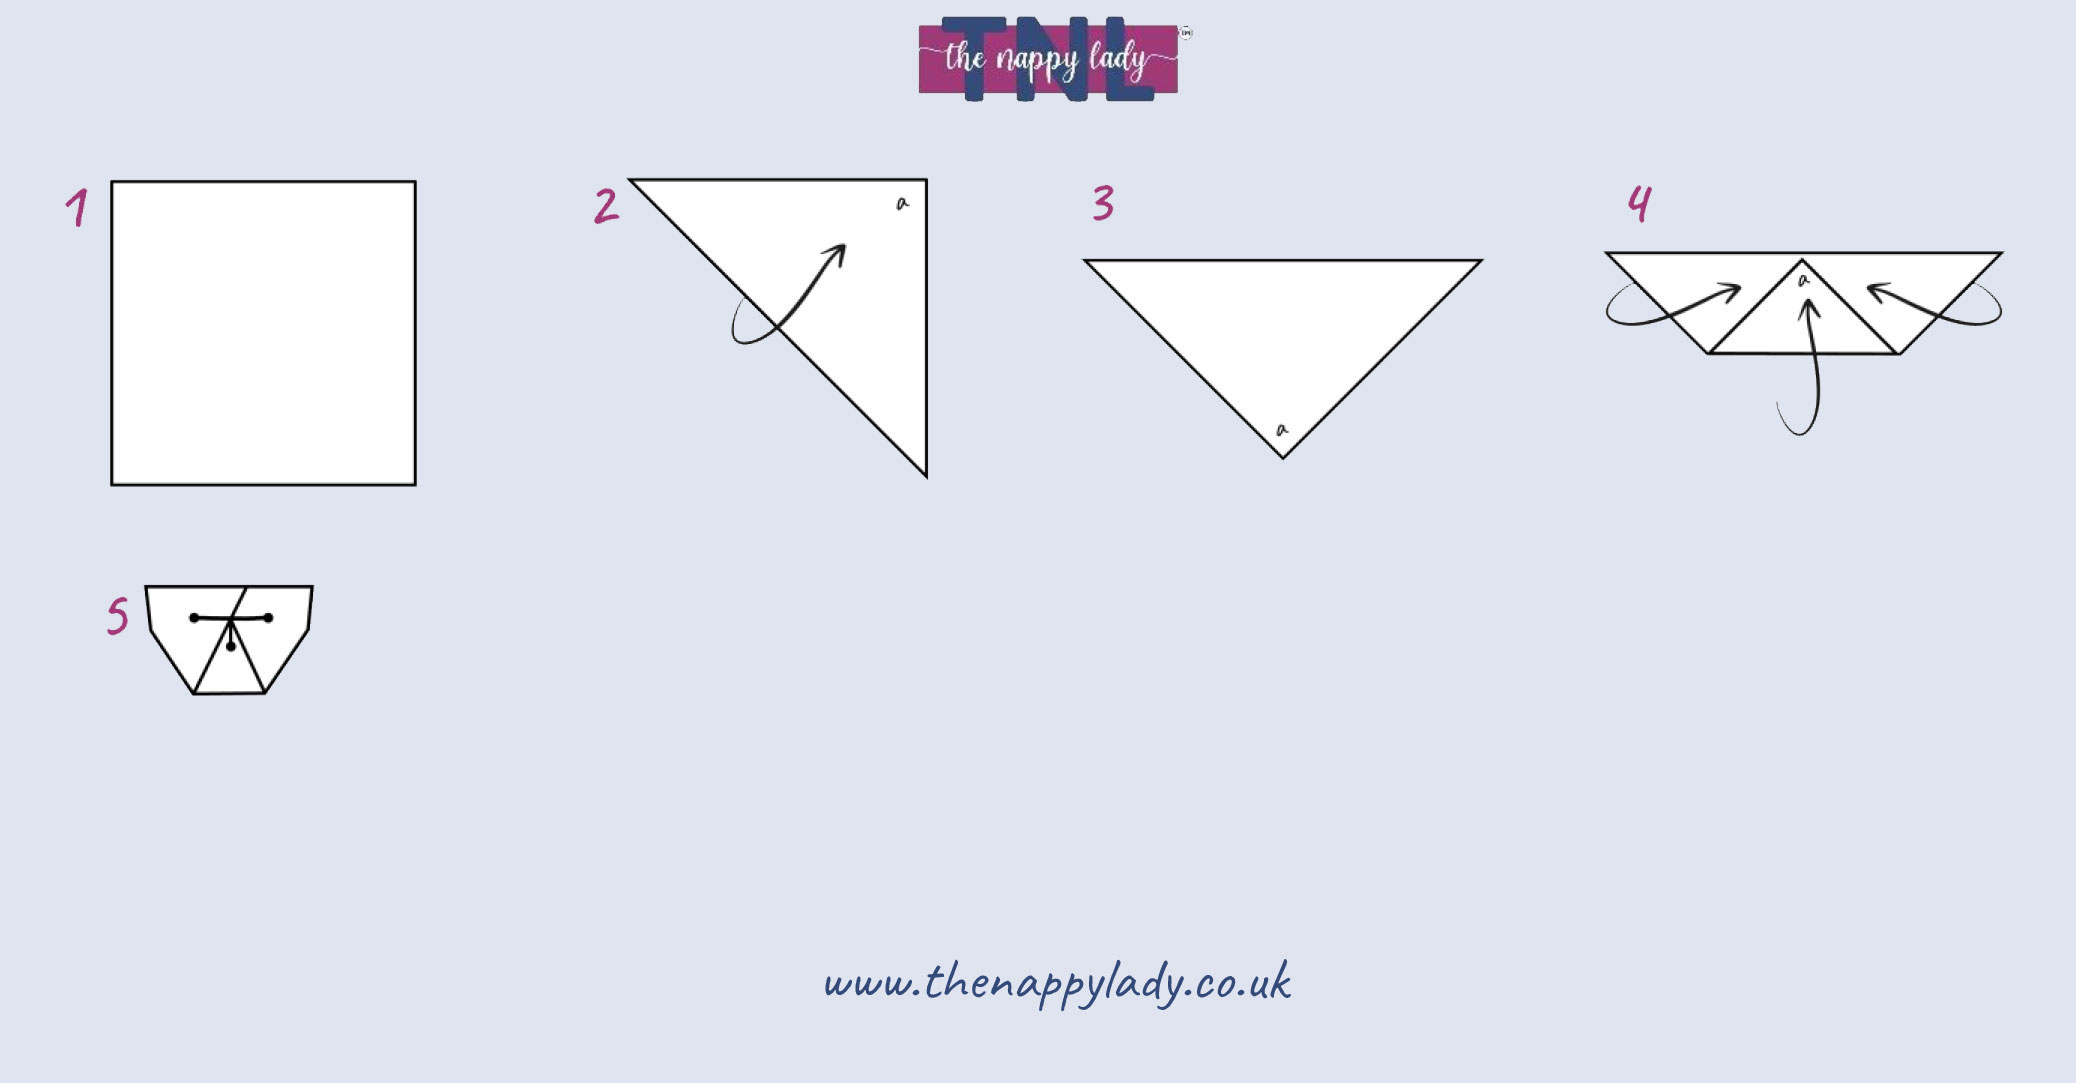
Terry Square Bat, Chinese or Butterfly Fold
Good for newborns. Small yet all encompassing, helps to contain runny poo. Very absorbent.
- Lay the terry out in a square.
- Fold in half from top to bottom.
- Then fold in half again from left to right.
- From the bottom right corner (A), take the top layer of material only and move it left to position B.
- Turn the whole nappy over from top to bottom.
- Fold one third of the square part in. The distance remaining should be half of the amount folded.
- Fold again.
- Add the baby.
- Fold up the bottom, bring each side wing around the baby.
- Fasten with a nippa. Tuck up any excess fabric on the legs to aid containment.
TNL Tip - This fold can be enlarged to fit an older child - support the bottom waist edge of the nappy with one hand, using the other hand pull the rectangular pad sharply down to increase overall back to front length.

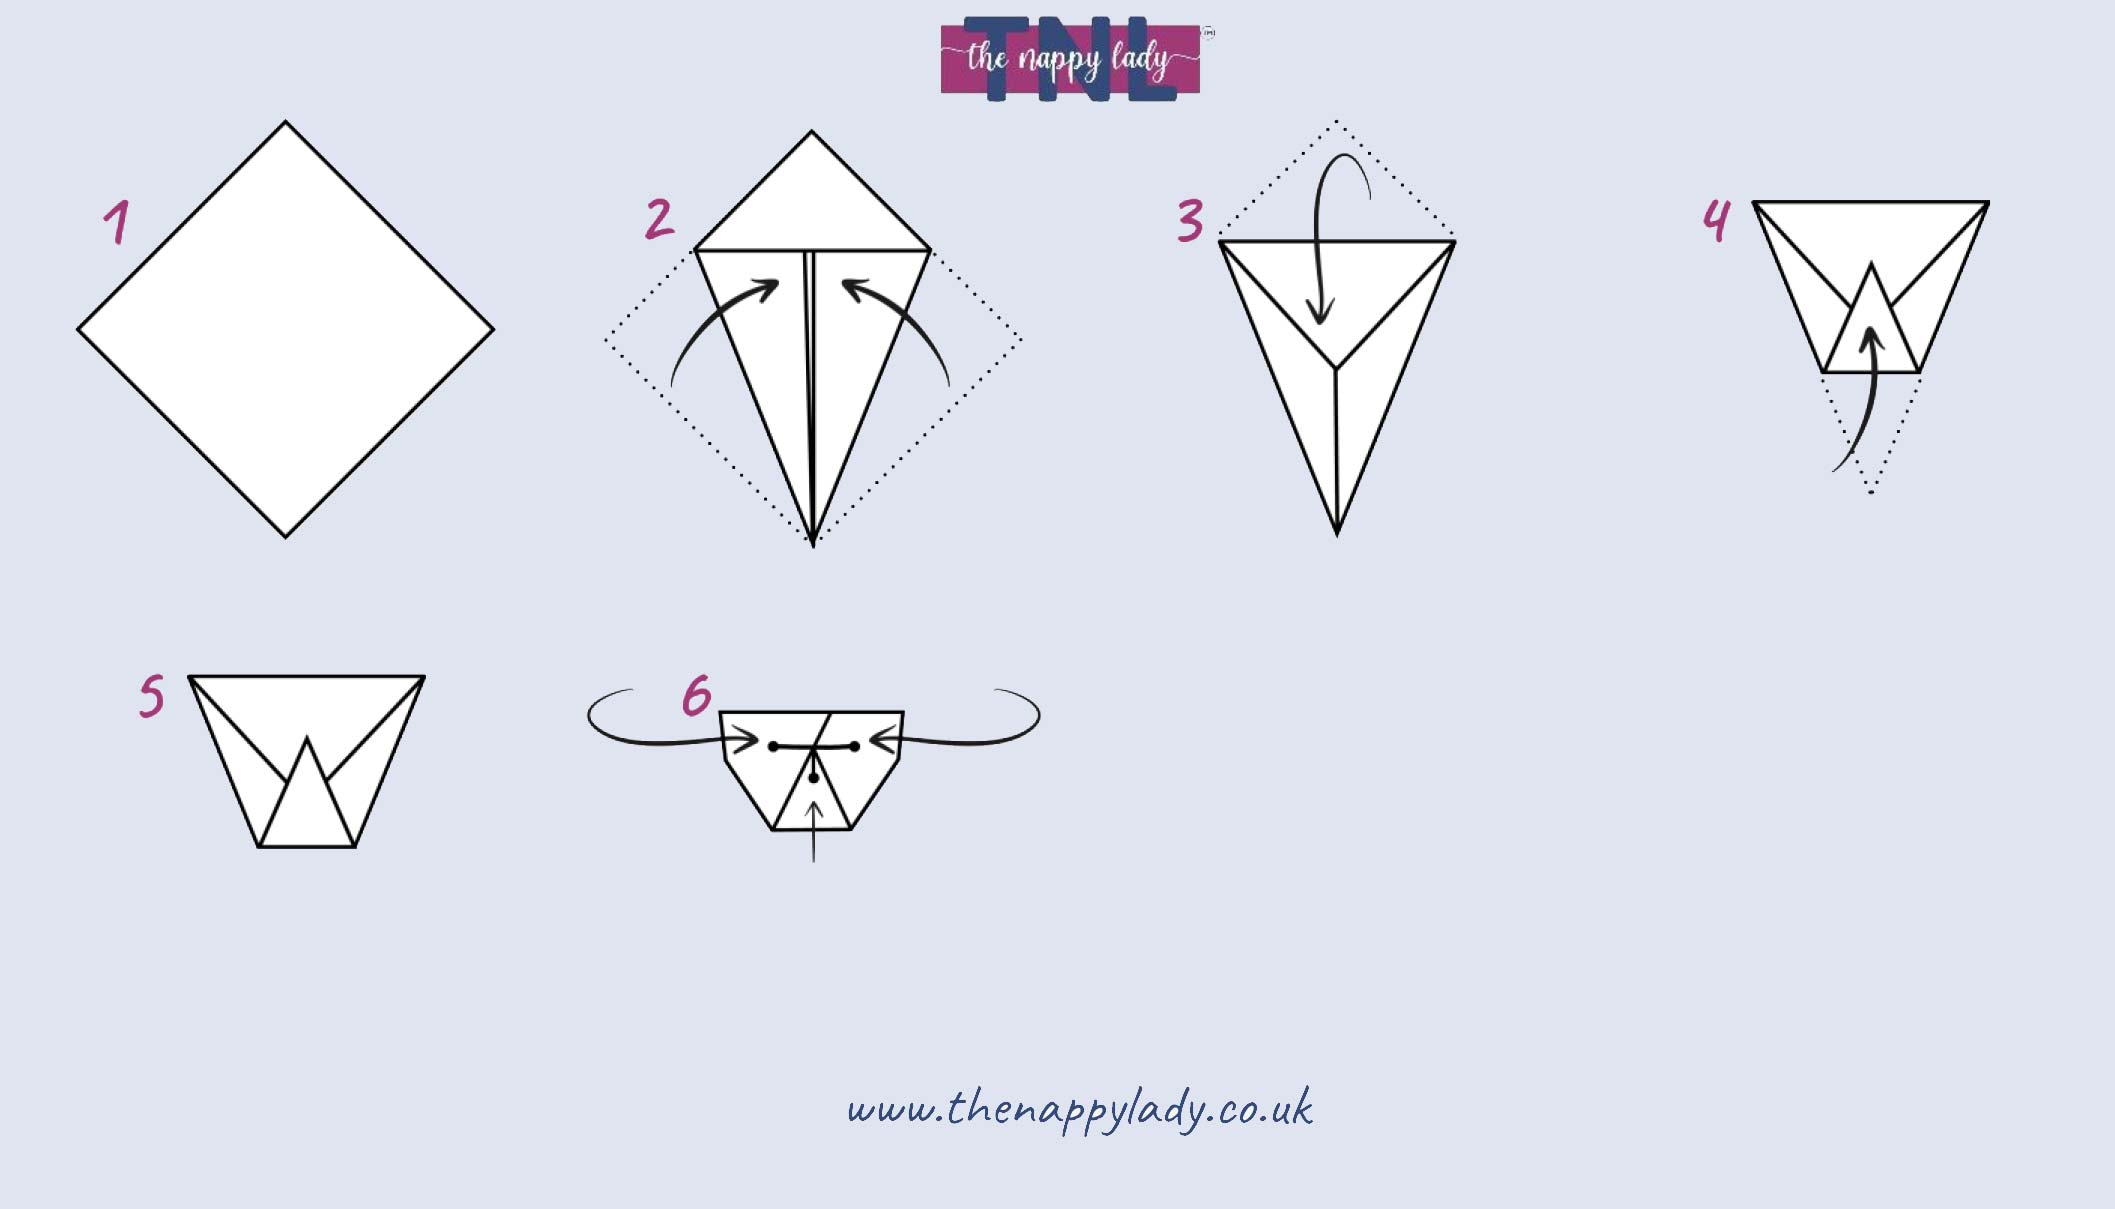
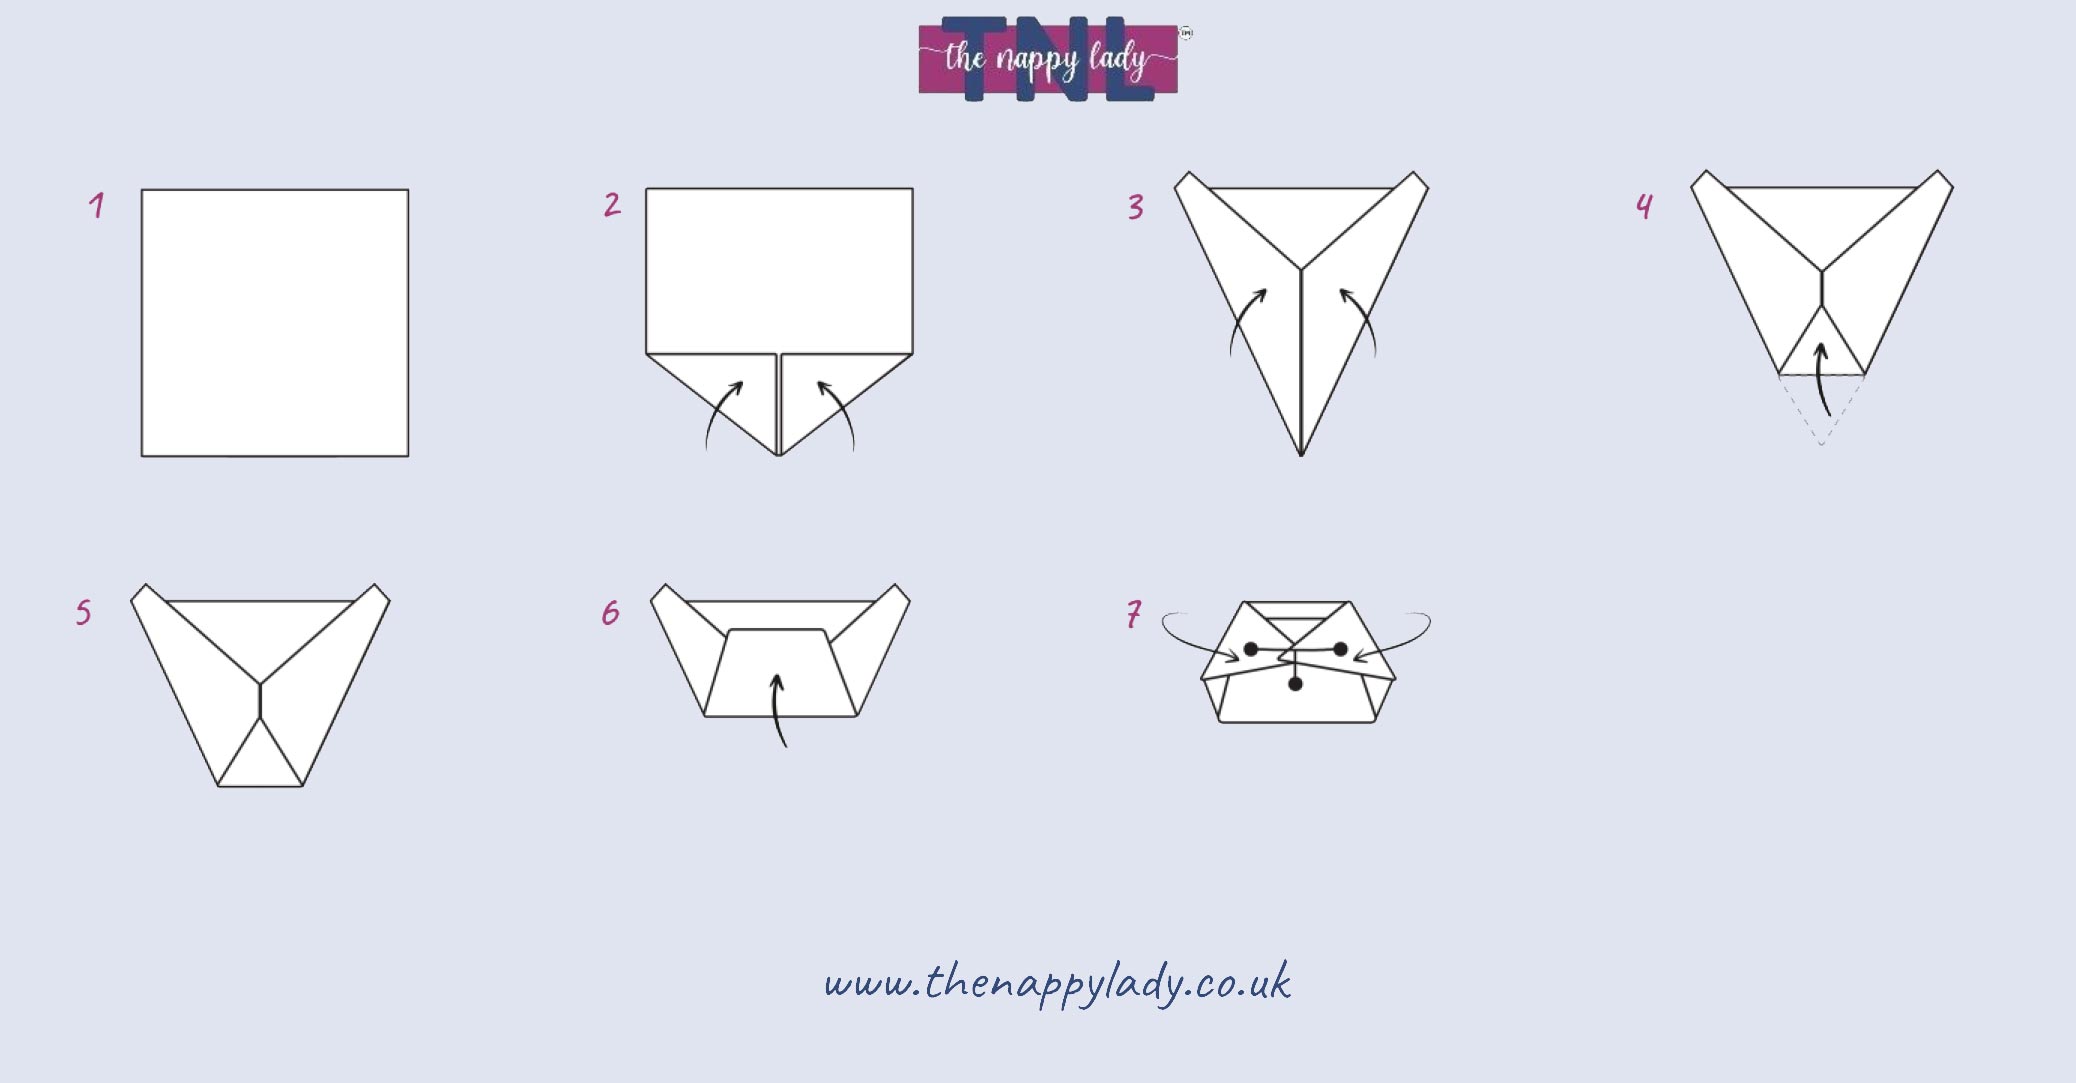
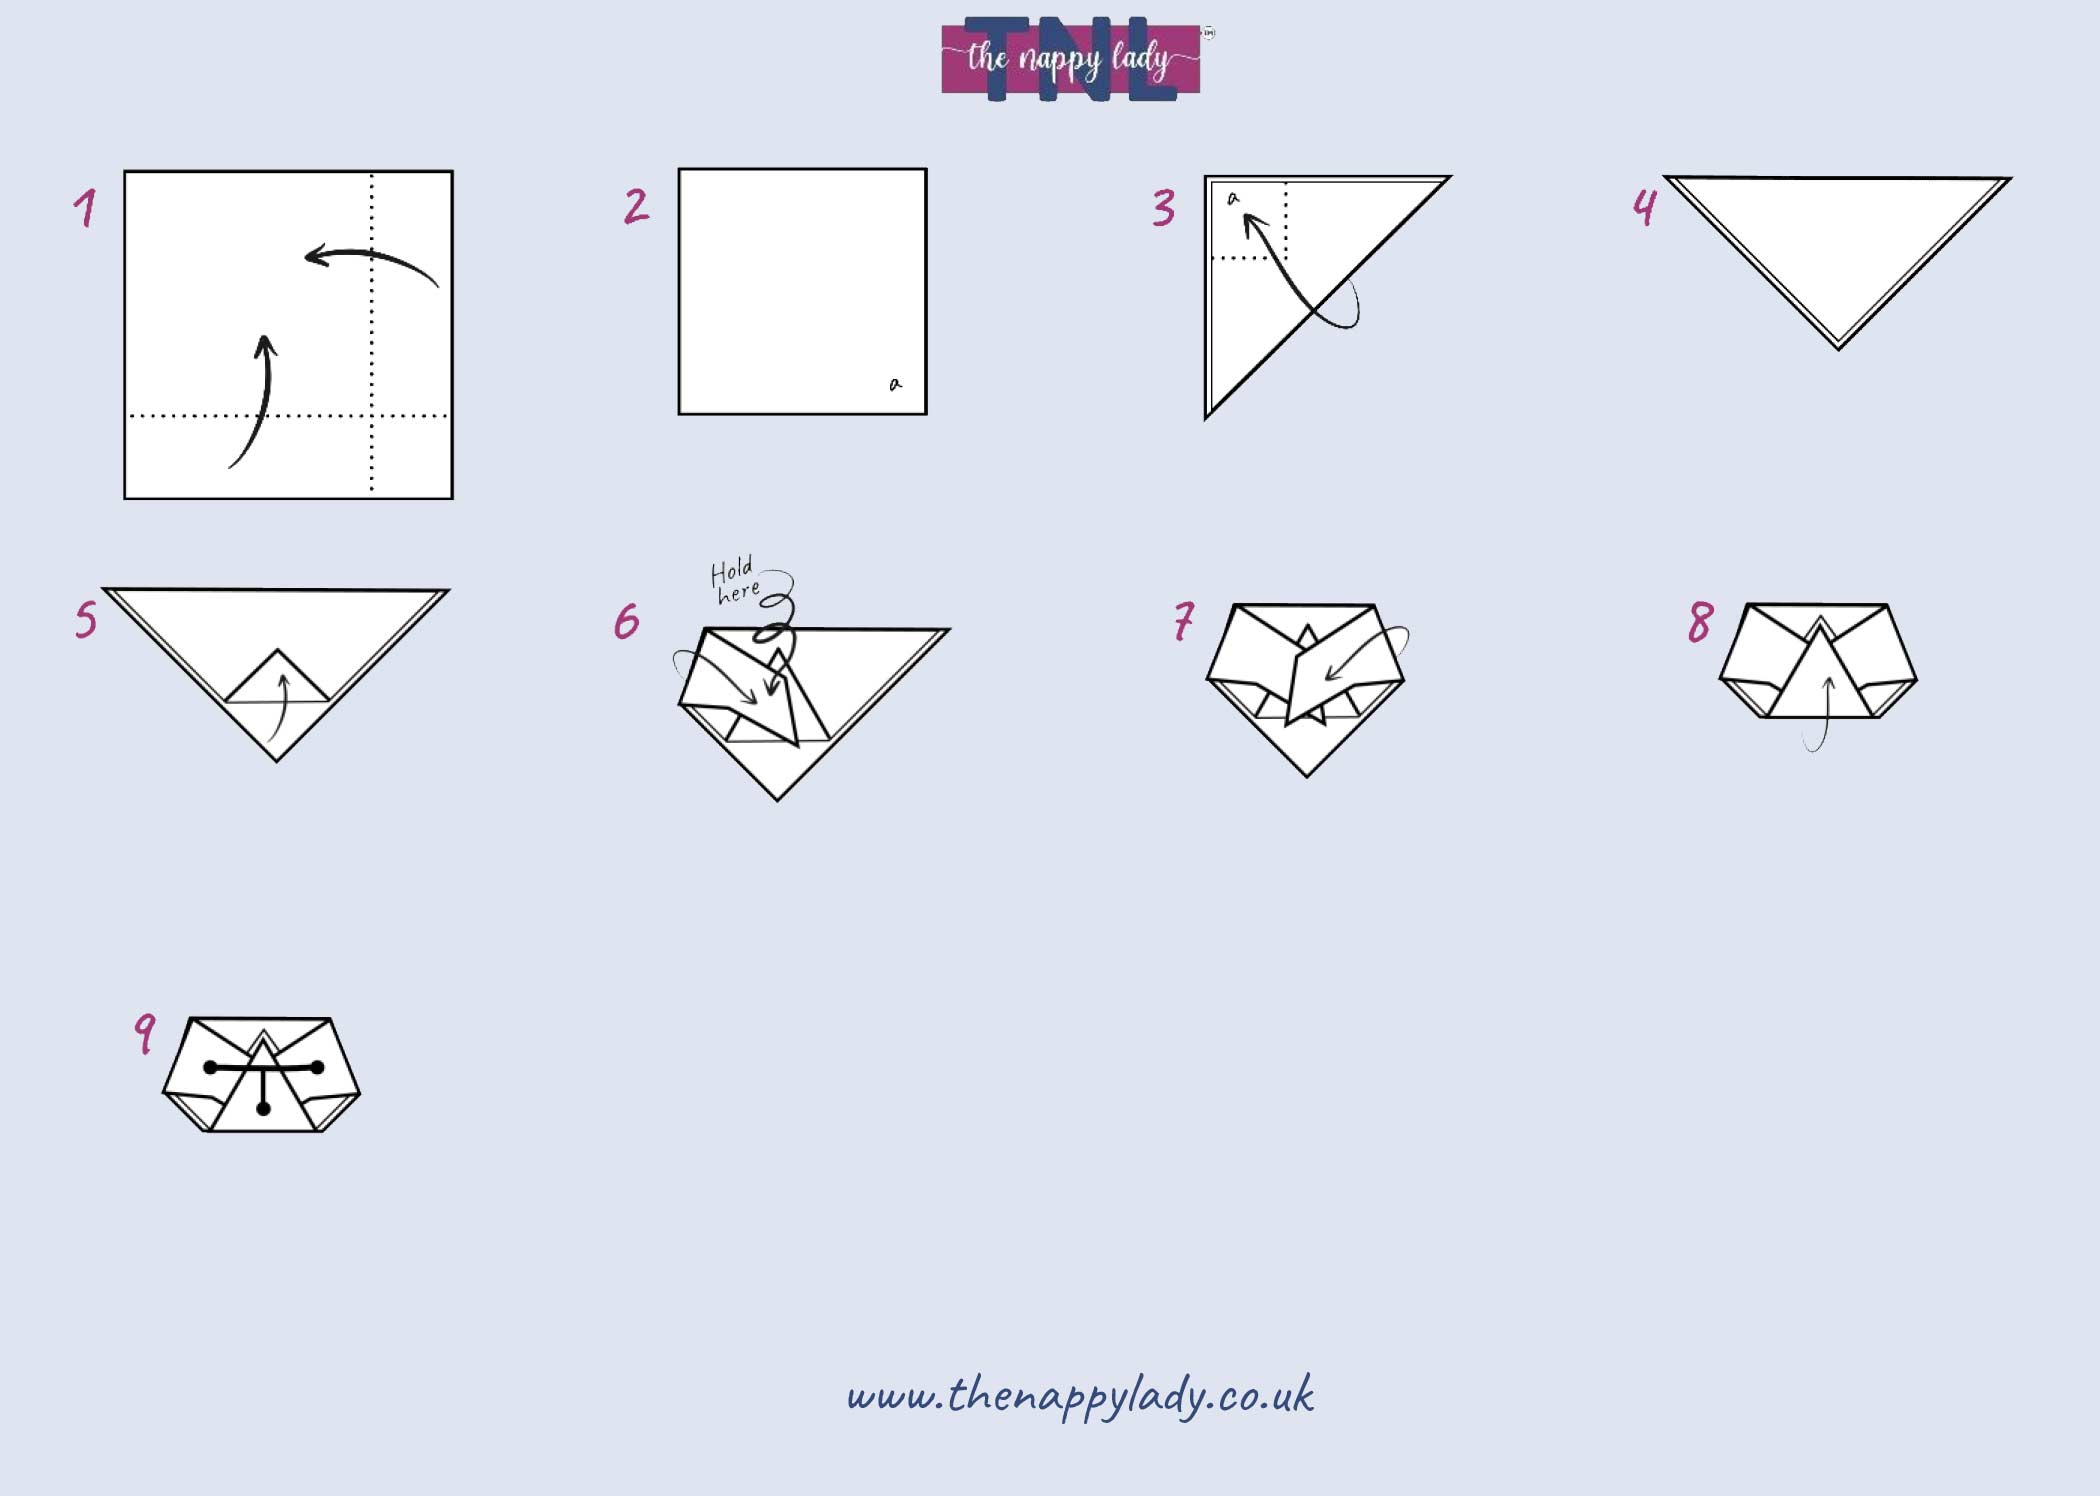
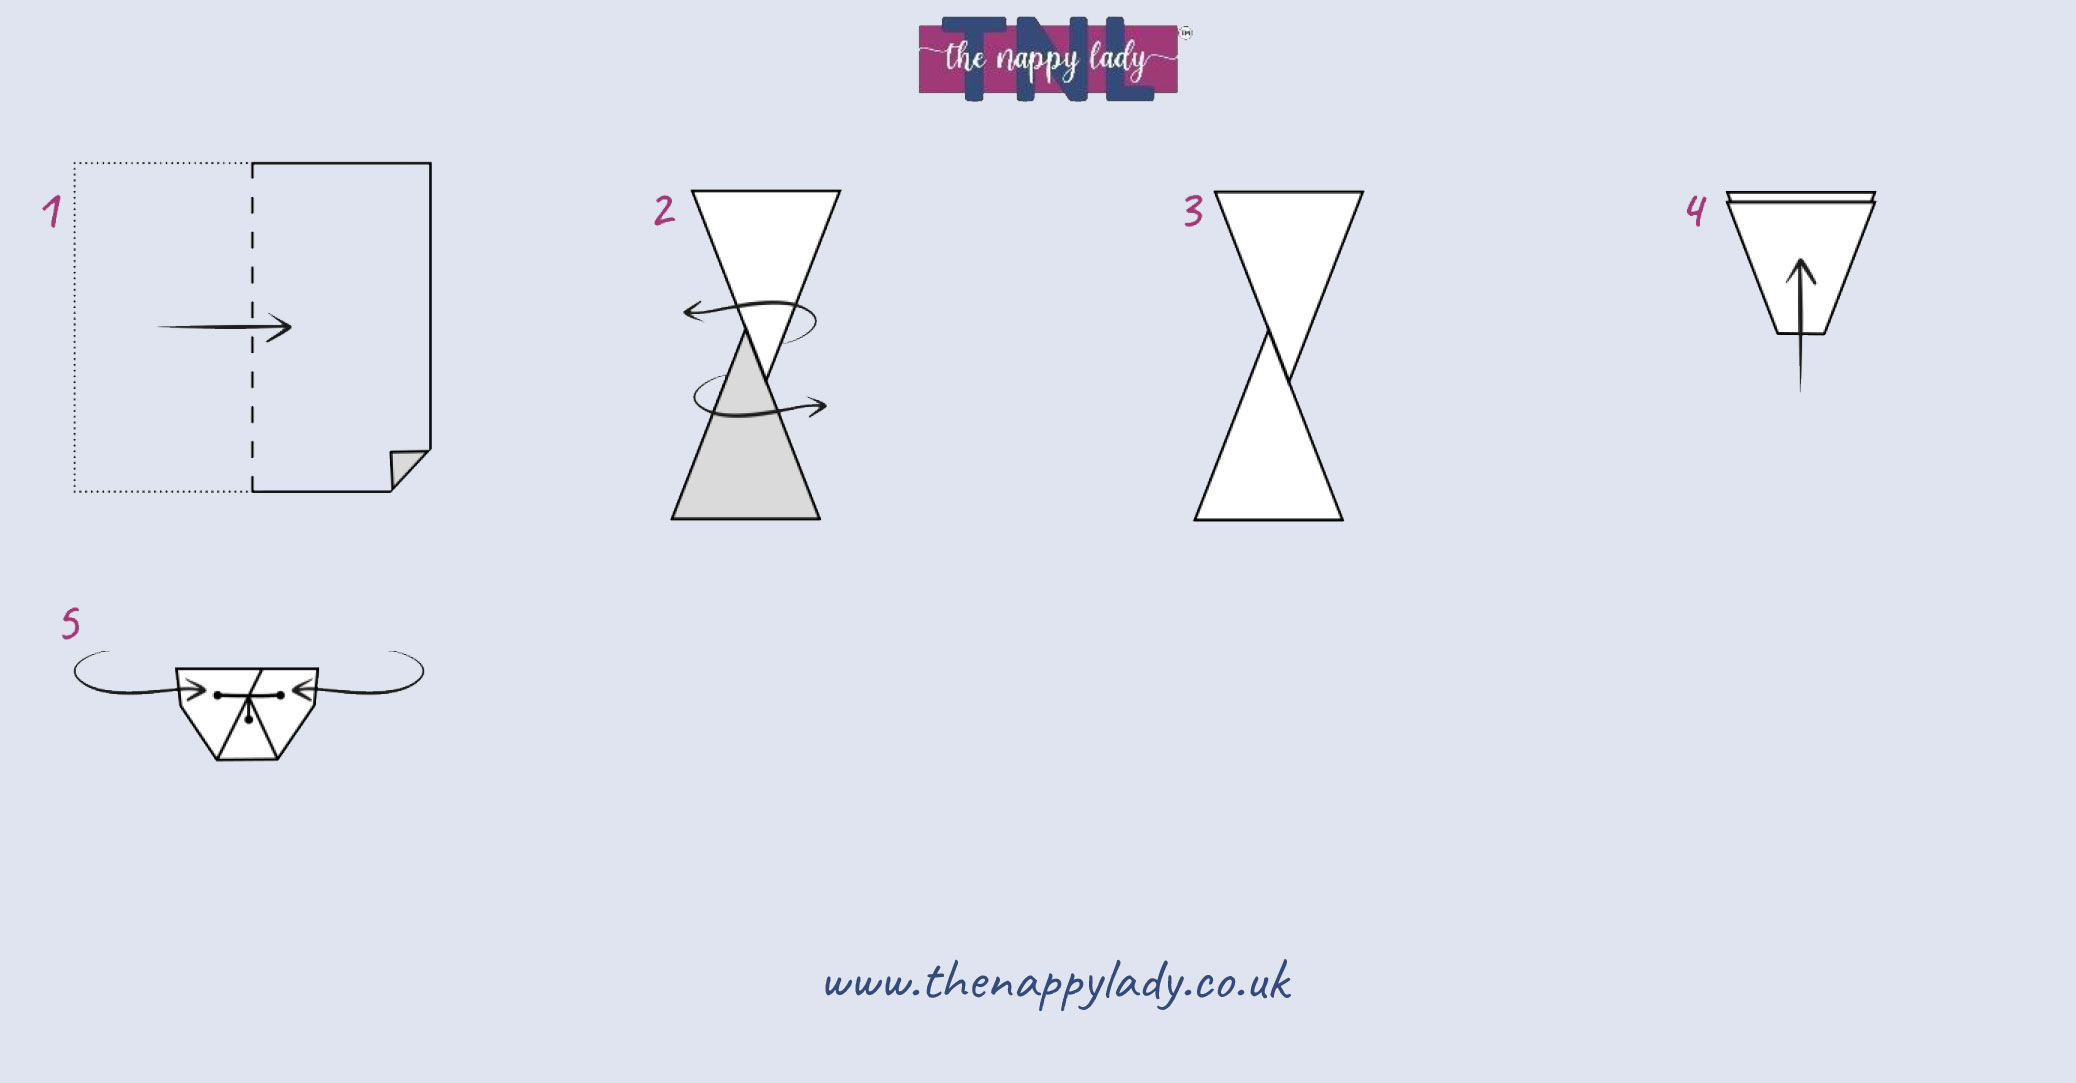
Terry Square Kite Fold
Quite a large fold, more bulky round the legs. Limited absorbency, but good to use to support a pad for overnight use. When on, tuck the terry in around the legs to provide better containment and a neater fit.
- Lay the terry flat, so that a corner is nearest to you.
- Fold the left and right corners into the middle to create a kite shape.
- Fold the top point down so you have a flat horizontal back edge.
- Fold the bottom corner up as far as needed, adjust to suit your baby's size.
- Add the baby.
- Fold up the bottom, bring each side wing around the baby and fasten with a nippa. Tuck up any excess fabric on the legs.
Terry Square Gaynor's Fold For Girls
As this gives a very trim fit around the legs and upper thighs, it is probably better for a girl than a boy.
- Lay the terry flat, so that a corner is nearest to you.
- Bring the top corner down past the bottom corner so it's about 10cm lower than the layer below.
- Take the bottom corner (a) back up but leave about 10cm overlapping in the middle.
- Fold the nappy in half from left to right (c) over to (d) to give a triangle with a bit sticking out.
- Turn the nappy around so the point is facing down.
- Add the baby.
- Fold up the bottom (if you tuck the ends in it makes a neater fold), bring each side wing around the baby and fasten with a nippa. Tuck up any excess fabric on the legs
Thanks to Gaynor for passing this on to us.
Terry Square Poo Catcher Fold
Does what it says! Good for pre-weaning babies.
- Lay the terry out in a square and then fold the top edge down approximately 1/4 of the way to the bottom edge.
- Fold in 1/3 from the left.
- Then 1/3 in from the right.
- Hold this pad lightly about halfway down on the left.
- Fold out the right flap to create a wing.
- Do the same for the left flap, which sits underneath.
- Fold up the end closest to you as much as required for your baby's size.
- Add the baby.
- Fold up the bottom, bring each side wing around the baby.
- Fasten with a nippa. Tuck up any excess fabric on the legs.
The Concorde Fold
This is a larger fold that is ideal for bigger babies or toddlers. It puts lots of absorbency at the front. When folding it I am reminded of all the times I've had to make paper aeroplanes for my children.
- Lay the terry out in a square.
- Fold the bottom two corners in to meet each other.
- Fold the corners on the left and right sides into the middle to meet each other, to make a more pointed shape.
- Fold the bottom point up to adjust the rise of the nappy. This can be higher or lower depending on the height of your baby.
- Add the baby.
- Fold the bottom up and over the baby.
- Bring each side wing around the baby and fasten with a nippa. Tuck up any excess fabric on the legs.
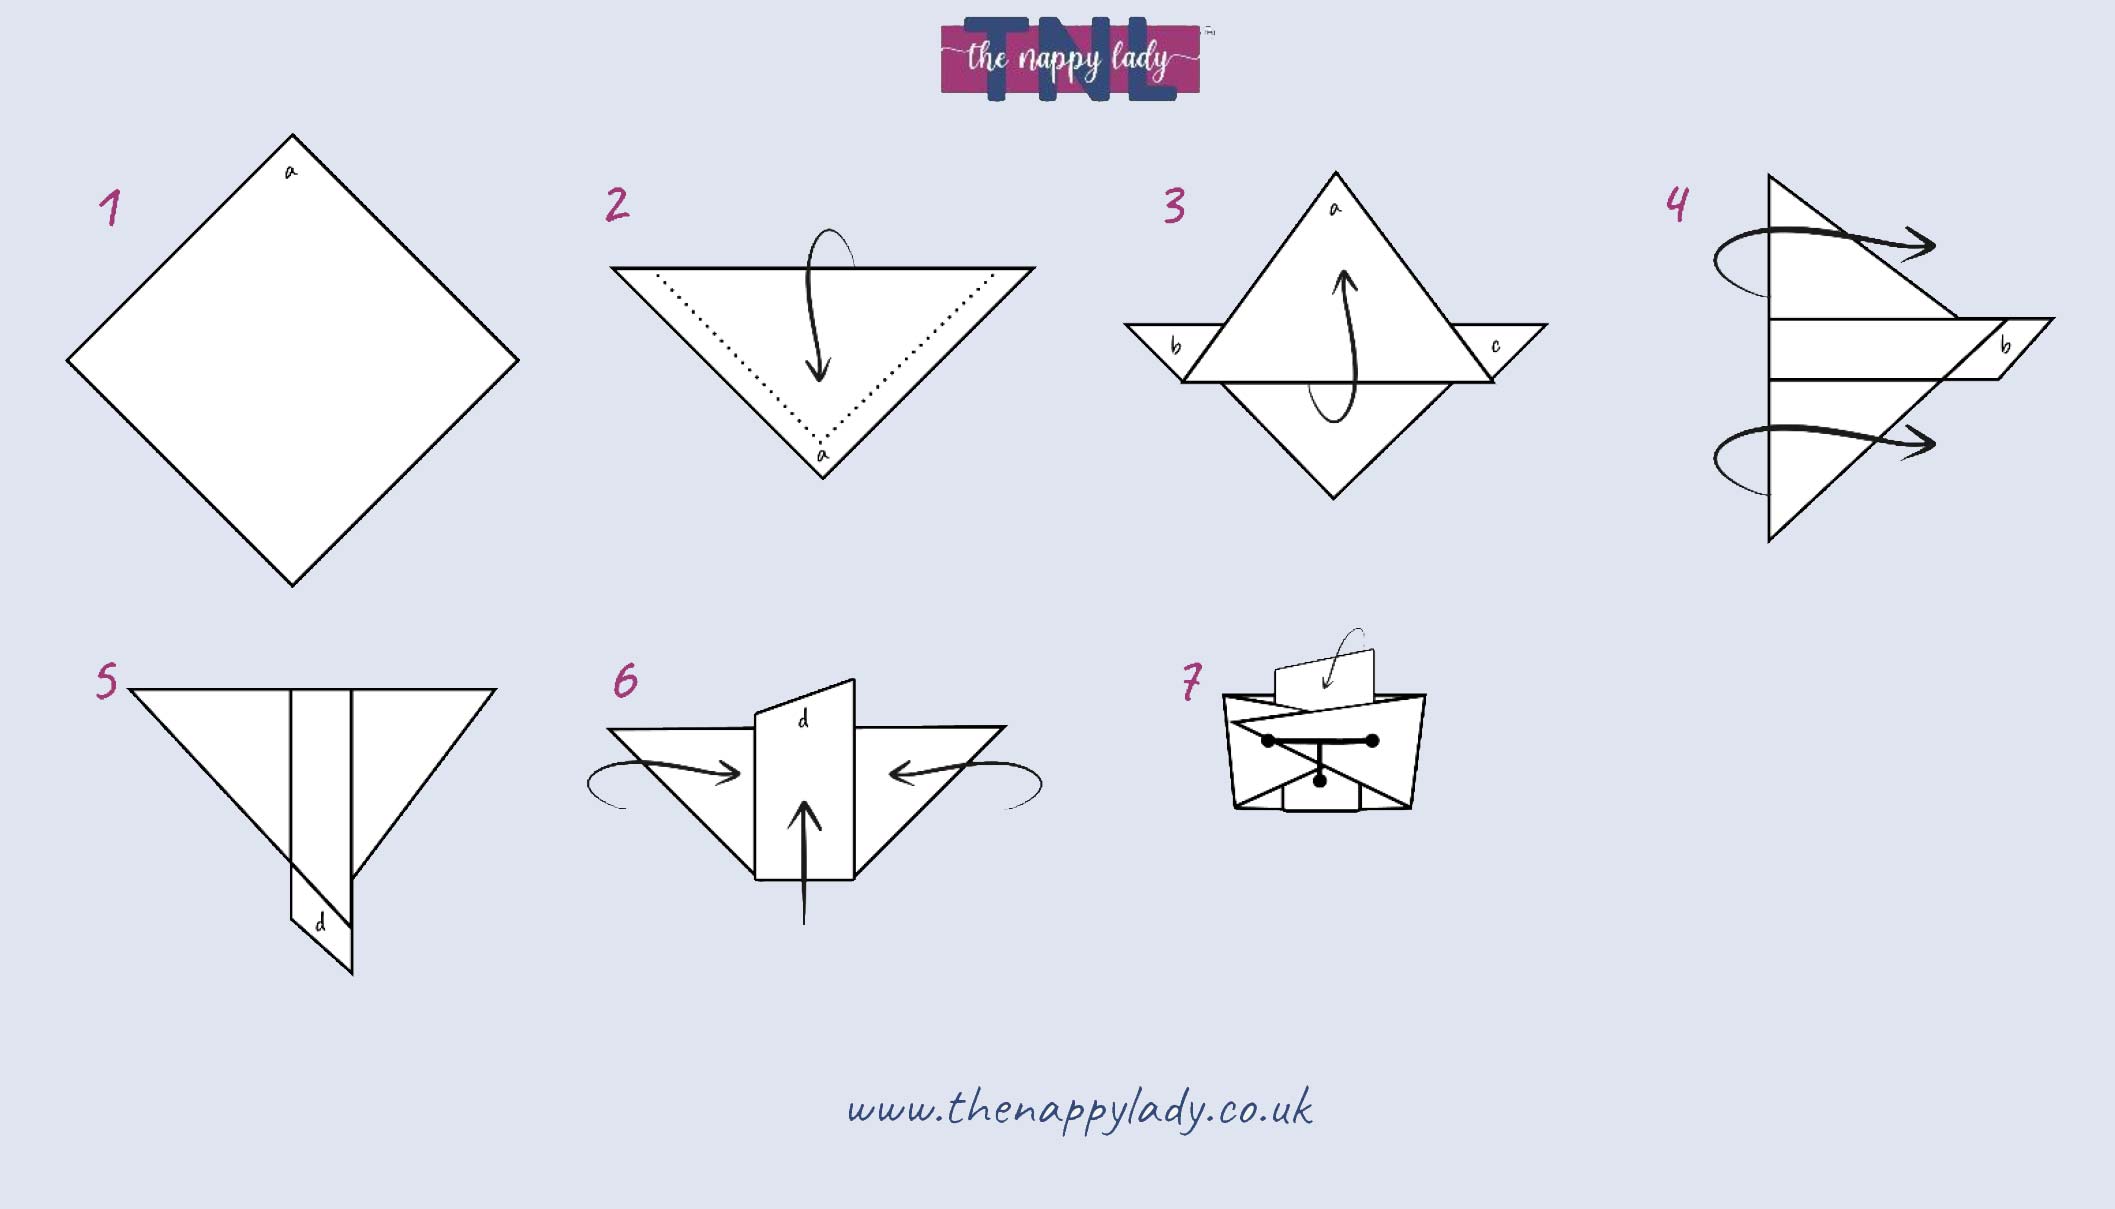
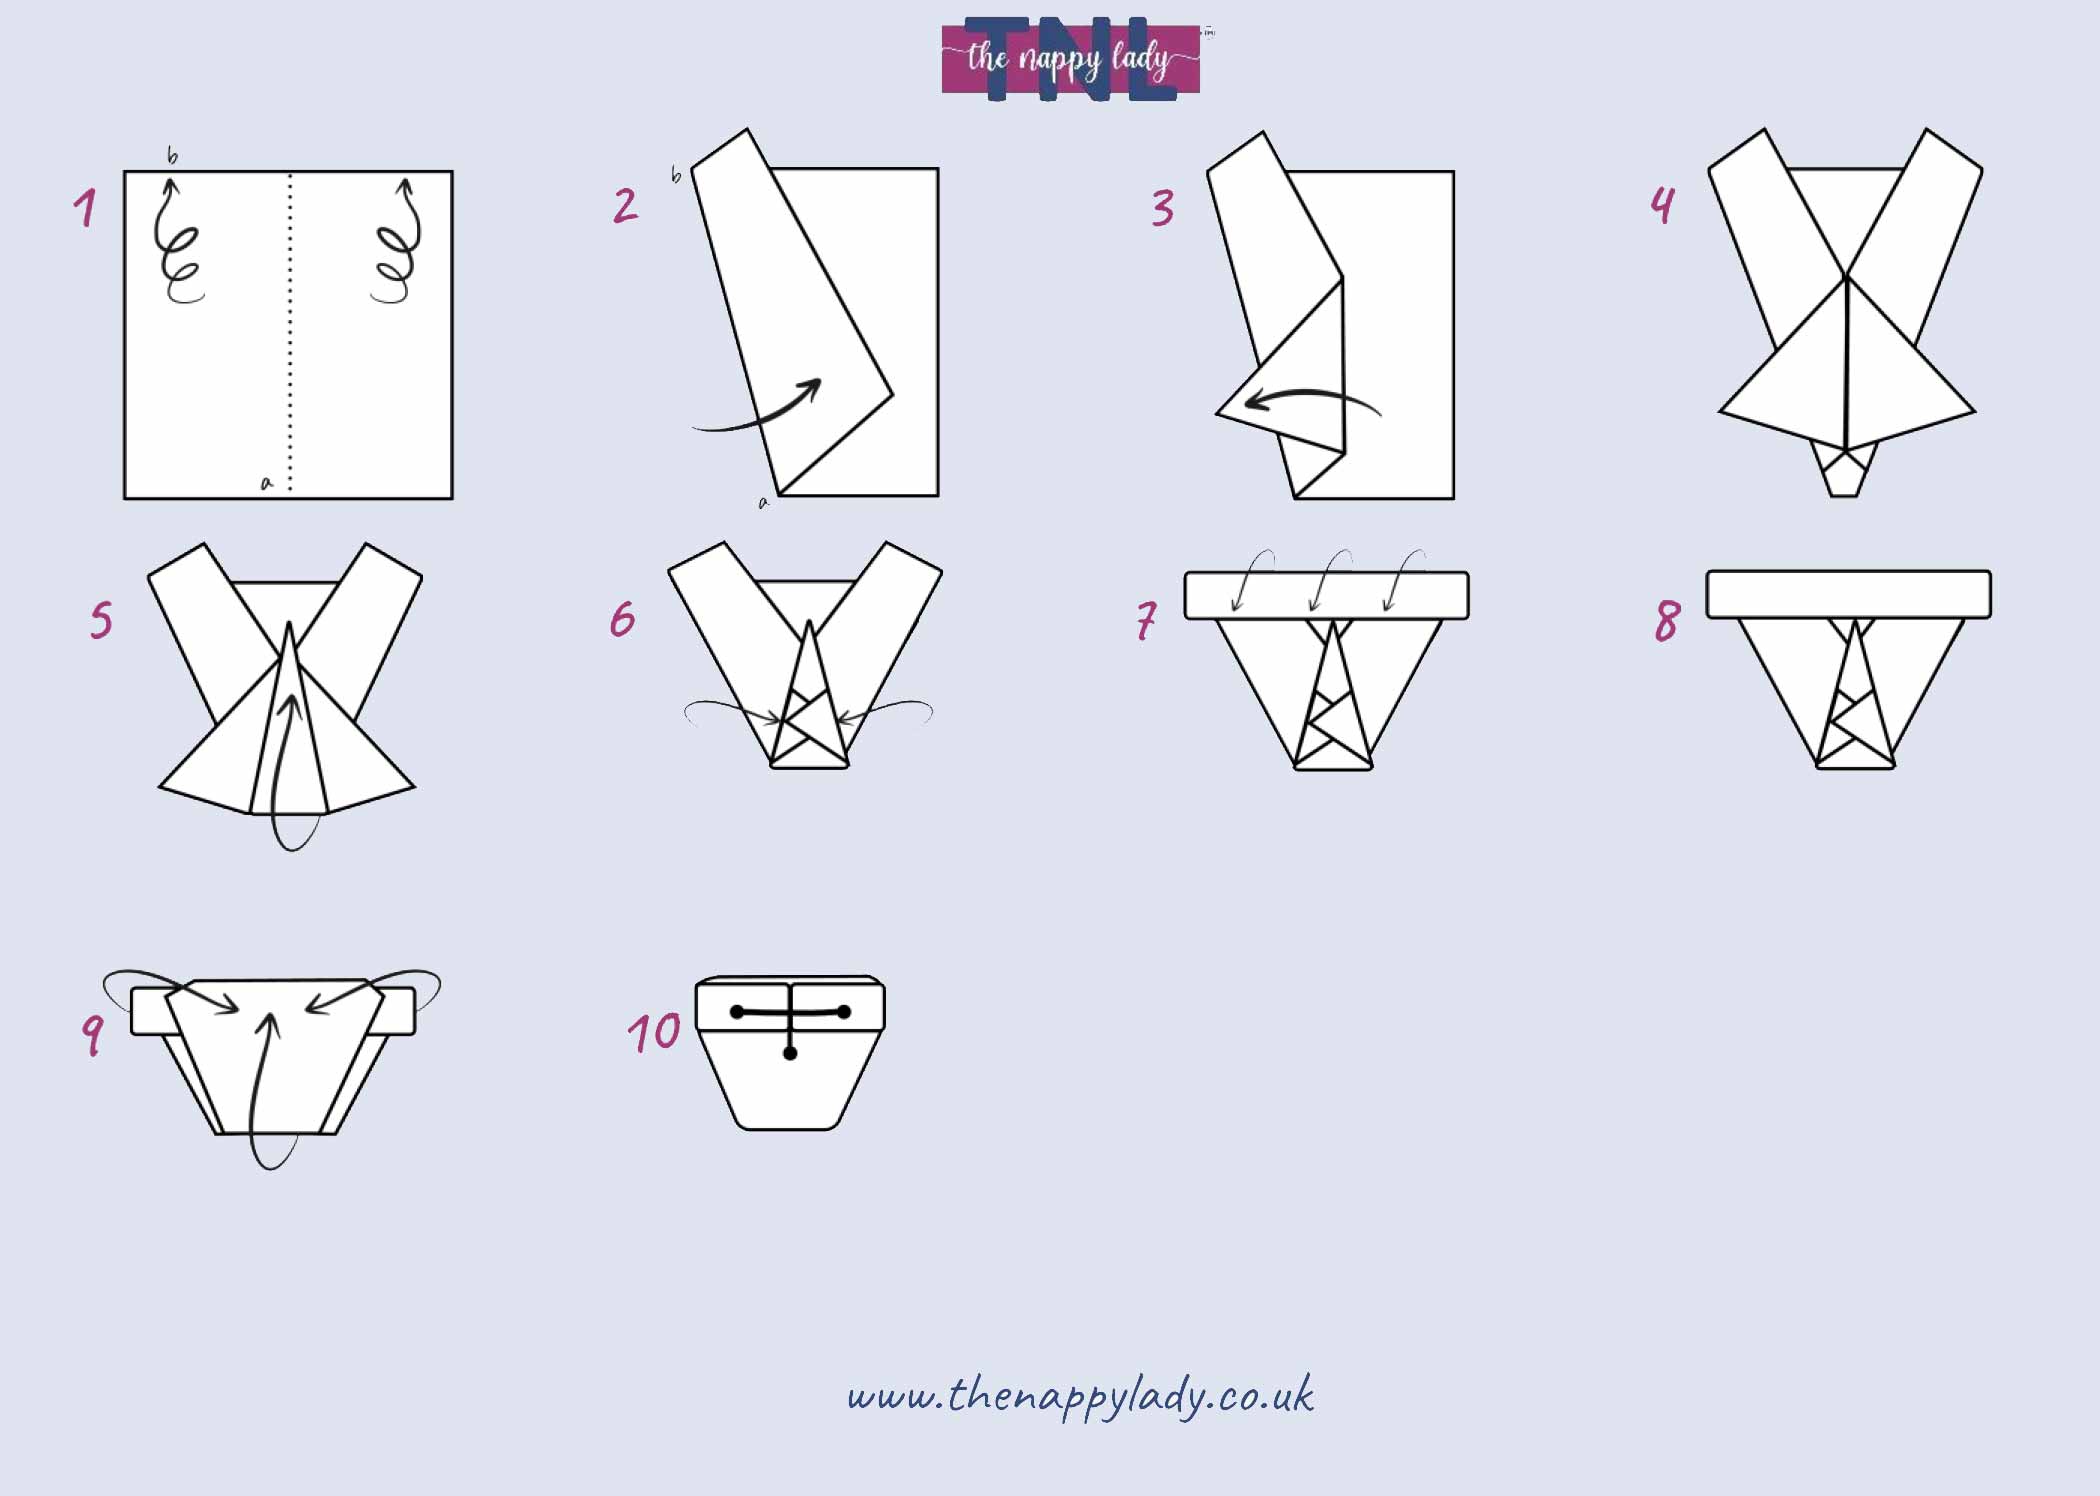
The Ro Fold for Boys
Very neat and high-cut round the legs and as such fits under a narrower cut wrap. There are a lot of layers at the front so it is good for a boy.
- Lay the terry flat, so that a corner is nearest to you then fold it in half along the diagonal.
- Fold the long edge over (about 1 1/2 inches).
- Fold up the right wing (a) and fold it inward and and upwards to create a point. Repeat for left wing (b).
- Fold the extremities of the points under and down - it now looks something like a wolf's head.
- Add the baby.
- Fold up one layer of the nappy in between your baby's legs.
- Fold in the two side pieces.
- The points should overlap and point downwards.
- Fold the outer single layer up between the legs to cover the points up.
- Fasten with a nippa. Tuck excess fabric up at the legs to improve containment.
Many thanks to Rosemary, who devised and passed on this fold to us.
She says: "My 4 month old son is a heavy wetter and a frequent runny poo-er (breast fed) and I was having trouble with both the Jo-fold and the corner fold and poo catcher for containment. I invented this one recently and so far it is easy to put on, requires not much pre-folding and has kept everything in."
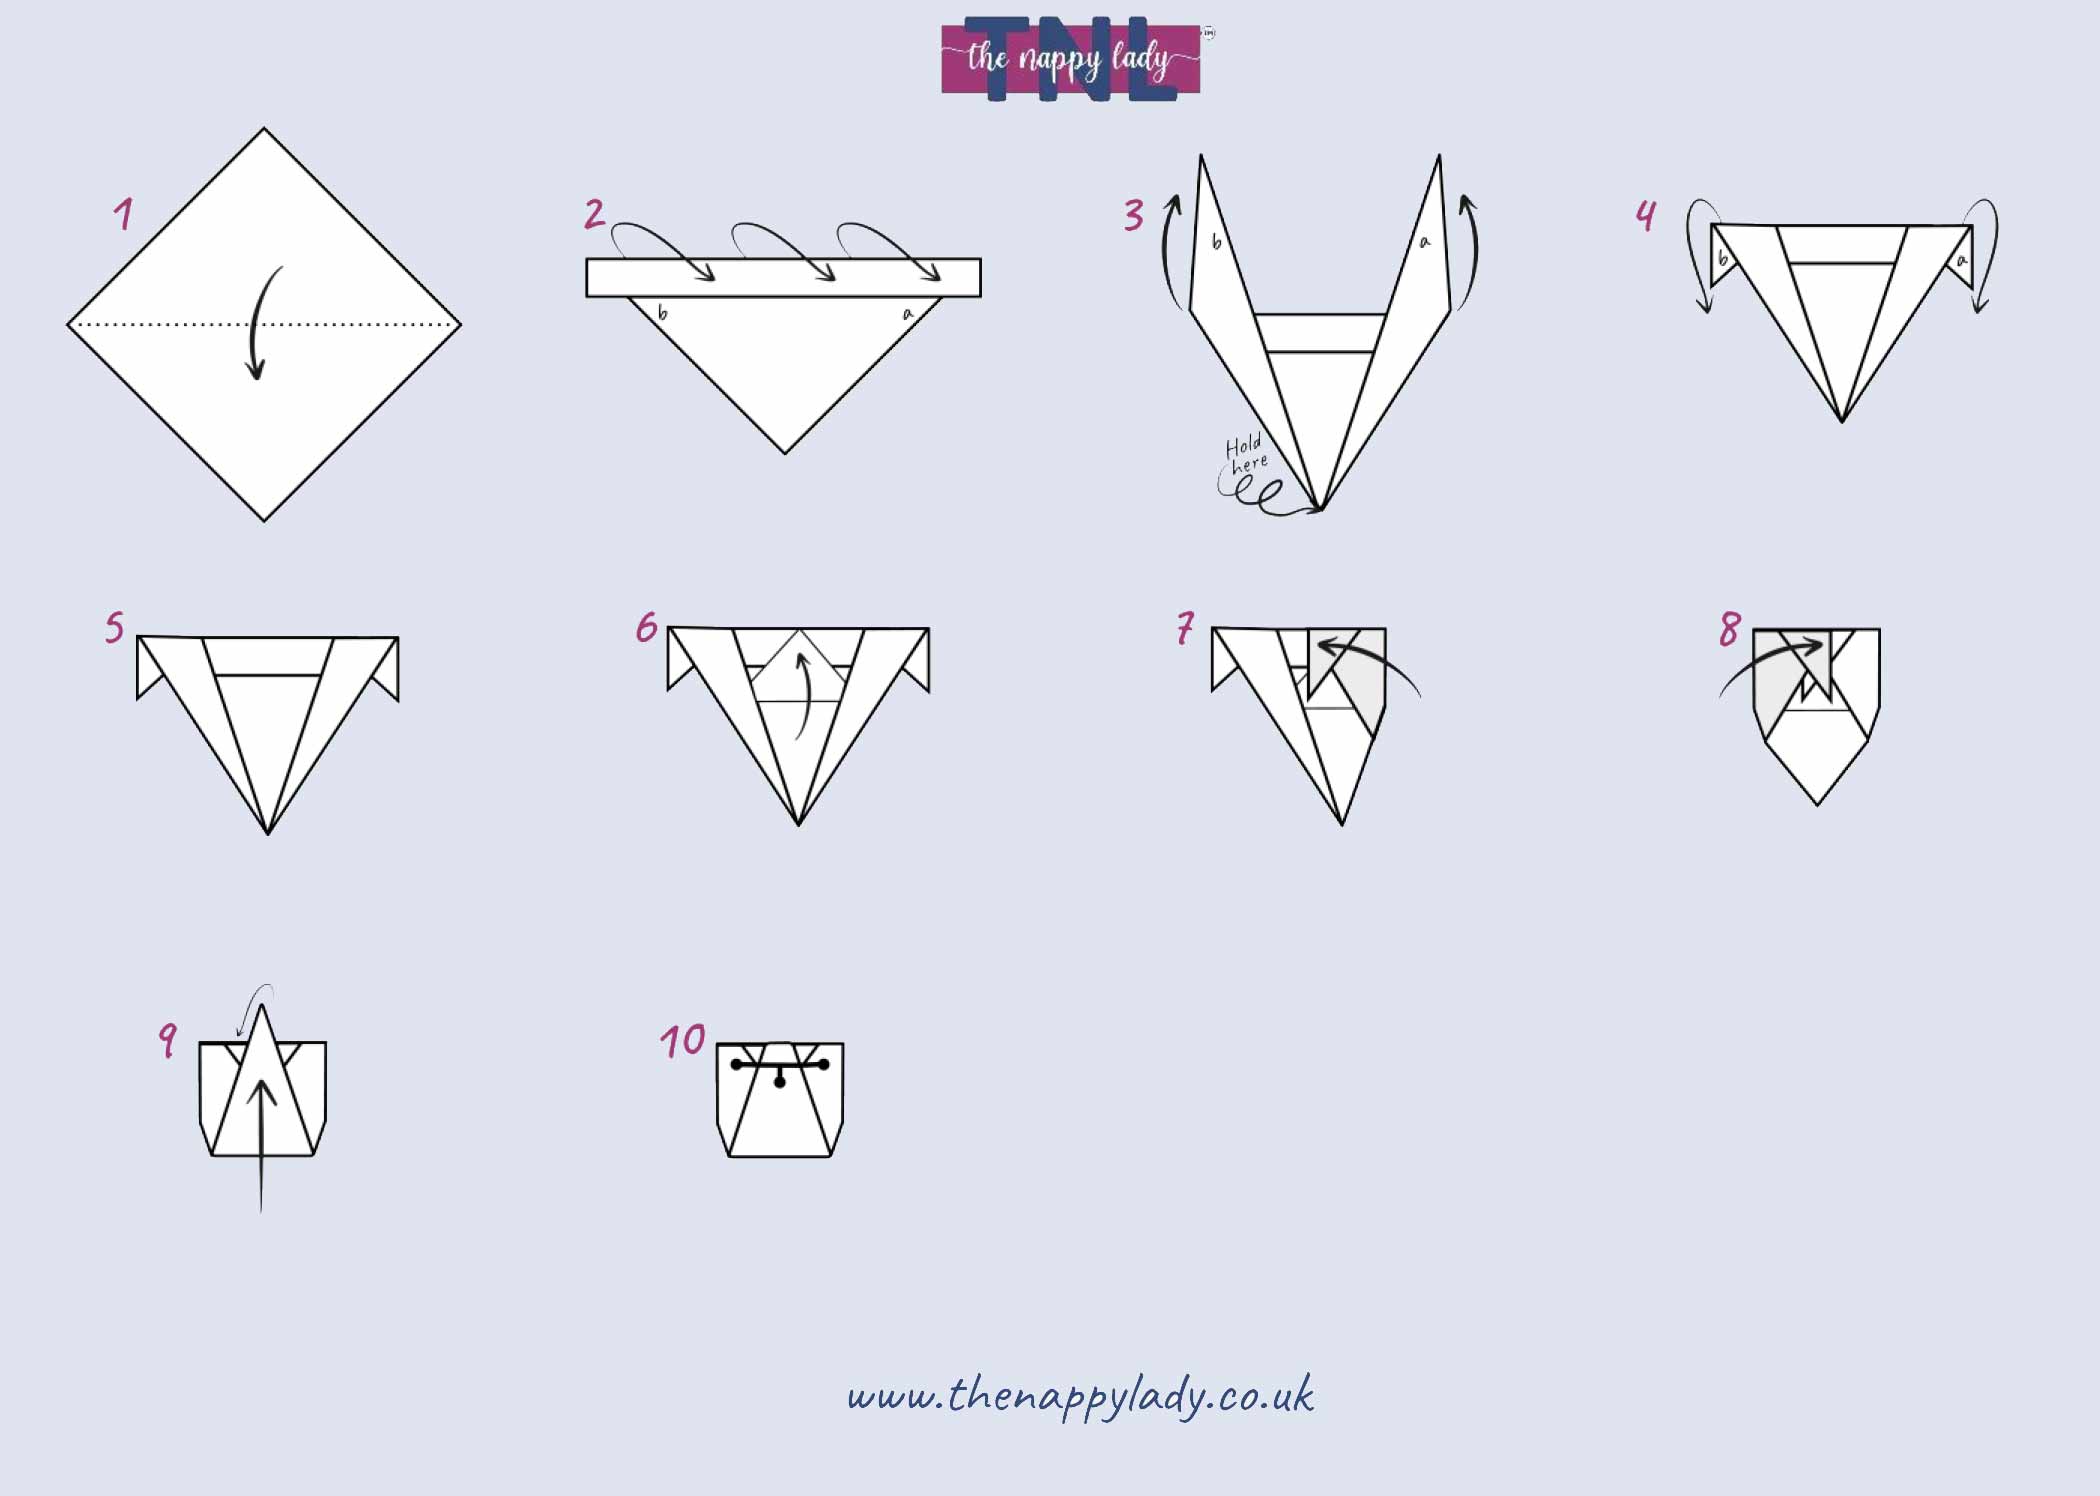
Maria's Fold for Boys
Because this fold starts with a flat edge at the back, it doesn’t waste fabric where it’s not needed. It has 6 or 8 layers of terry at the front but only 1 or 2 at the back. So maybe not recommended if your boy does runny poos, but otherwise it’s a winner. Despite its thickness at the front, this fold gives a really neat nappy with a fantastic fit if your boy has a fat tummy, you can keep the nappy short in the rise and fasten it under his tum. With the legs rolled in well I think it’s slimmer.
Maria wrote: "I liked the idea of using terry squares but could never find a fold I was happy with. Most folds seemed to be designed with girls in mind, with all the thickness in the middle or at the back, while the folds with any sort of thickness at the front just didn't seem to provide a snug fit. So I dug out my old origami books and had a go at designing my own fold. I won’t deny that it’s a bit tricky (no one is going to call this a convenient fold!) but it works so well I just have to share it."
- Lay out the nappy with one of the flat edges (ie. not a corner) towards you. Imagine a centre line.
- Fold from point a (the centre of the edge nearest you) to point b (3 or 4 inches from the top left hand corner). Tip: Adjust for a bigger baby by taking point B closer to the top LH corner, and for a smaller baby by taking it closer to the centre of the top edge.
- Now fold the top layer back along the midline of the nappy, as shown.
- Repeat on the other side till you have a fishy shape.
- Fold the bottom corner of the nappy up between 1/2 and 3/4 depending on the size of the baby.
- Fold the flaps at the front into the middle for extra absorbency.
- Adjust the rise by folding more of the nappy down at the top, giving a shorter nappy for a small baby, or by folding less of it up to give a longer nappy for a bigger baby.
- Add the baby.
- Fold up the bottom, bring each side wing around the baby.
- Fasten with a nippa. Tuck up any excess fabric on the legs to aid containment.
TNL Tip - there are two ways to adjust the size of this: at step 5 you can fold the point up higher to make a smaller nappy. Also at step 7 you can adjust the size by how far you fold down the back of the nappy.
And there you have it: very similar to the kite fold in shape, but with only 1 or 2 layers of fabric at the back, and 6 or 8 layers at the front, just where your boy needs it. For best results, fasten with a Nippa and roll the legs in just before you fasten it. If when you come to fasten the nappy you find you’ve made it a bit too narrow at the back, no need to fold the whole thing again - you can simply ease a little more fabric out of the folds at the top corners when you’re doing it up.
Maybe not the simplest of folds, but Maria gets full marks for ingenuity, and an honorary degree in origami!
Lindsey's Newborn Fold
Ideal for use on newborns, especially boys, as the padding is at the front. Works best with a muslin containing a booster rather than a terry, which is a bit bulky. Actually, a decent muslin provides reasonable absorbency on its own for a newborn anyway, if being changed frequently. Provides a dip at the front around the healing navel area.
- Lay the muslin out in a square
- Fold the bottom right corner up to the top left corner to make a triangle.
- Fold the bottom left corner up to the top right corner to make a smaller triangle. With the long edge away from you. Add a booster vertically into the middle at this stage.
- Add the baby.
- Bring up the front point of the nappy, containing the booster up between your baby’s legs.
- Bring one side over the front and fold down the side points to provide extra thickness at the front.
- Repeat the other side.
- Fasten with a nippa then tuck any excess fabric up at the legs to improve containment.
The Corners Fold
This is effectively a variation of Lindsey's newborn fold and also works well with either Muslins or terries. It's a snug fit which offers good containment.
- Lay the terry out in a square and then fold the right edge and the bottom edge in by about 10cm.
- This will give you a smaller square.
- Take the bottom right corner (a) and move it to the top left corner to make a triangle.
- Turn the nappy around so the point is facing down and add the baby.
- Bring up the top layer of the bottom corner (leaving one layer behind).
- Bring the left side wing around baby and tuck the corner between baby's legs.
- Repeat for the right side.
- Bring up the bottom corner
- Fasten together the side wings using a nippa. Tucking the final corner into the nappy will give a neater fold. Tuck up any excess fabric on the legs to aid containment.
TNL Tip - during step 1 to make the fold smaller fold in further than 10cm, to make it bigger fold in less than 10cm.
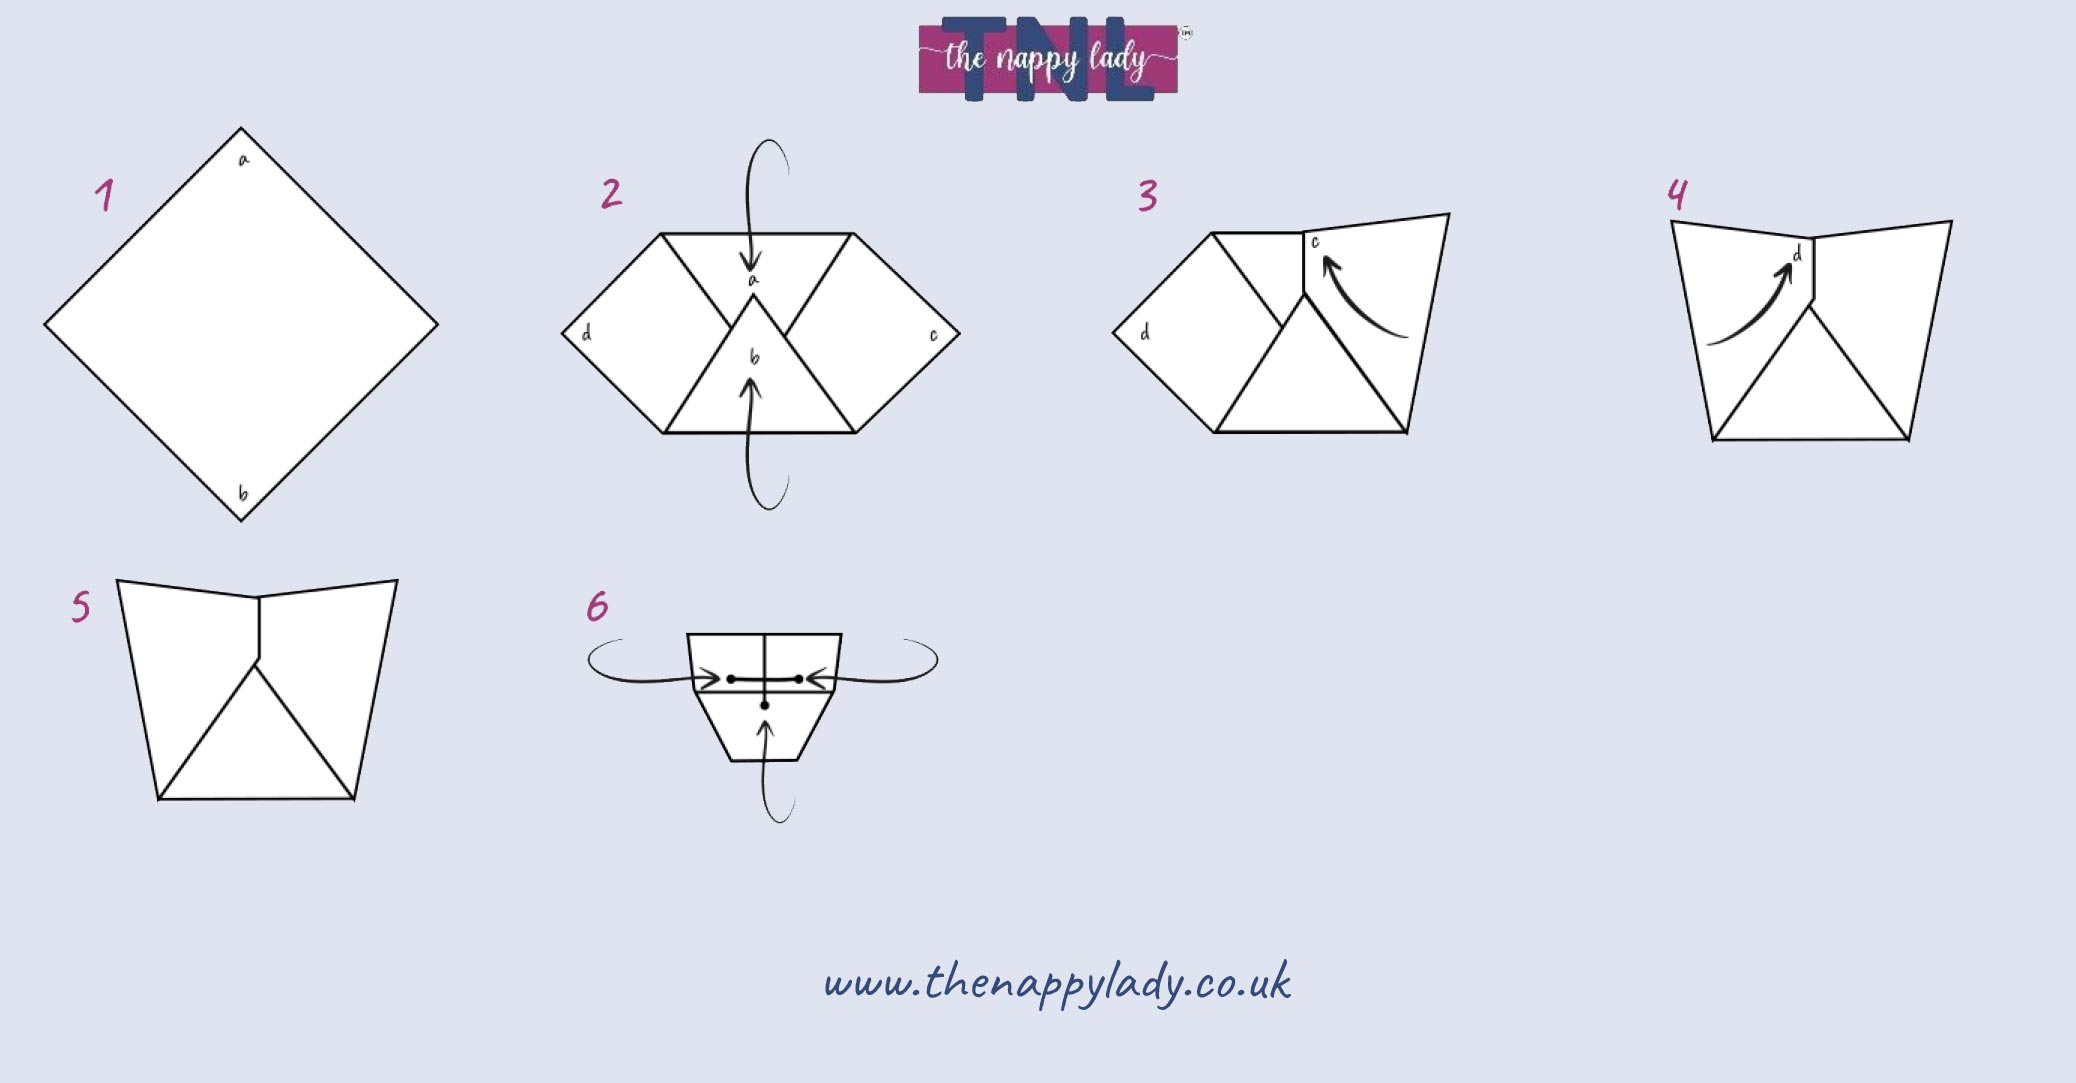
Terry Square Neat Fold
Essentially the same as the Kite, just folded in a different order.
- Lay the terry flat, so that a corner is nearest to you.
- Fold the top and bottom corners toward the centre. How far you fold depends on the size of the nappy required.
- Fold the far right corner (point a) up to meet in the middle of the waistband (uppermost) edge.
- Repeat for the left side.
- Add the baby.
- Fold up the bottom, bring each side wing around the baby and fasten with a nippa. Tuck up any excess fabric on the legs.
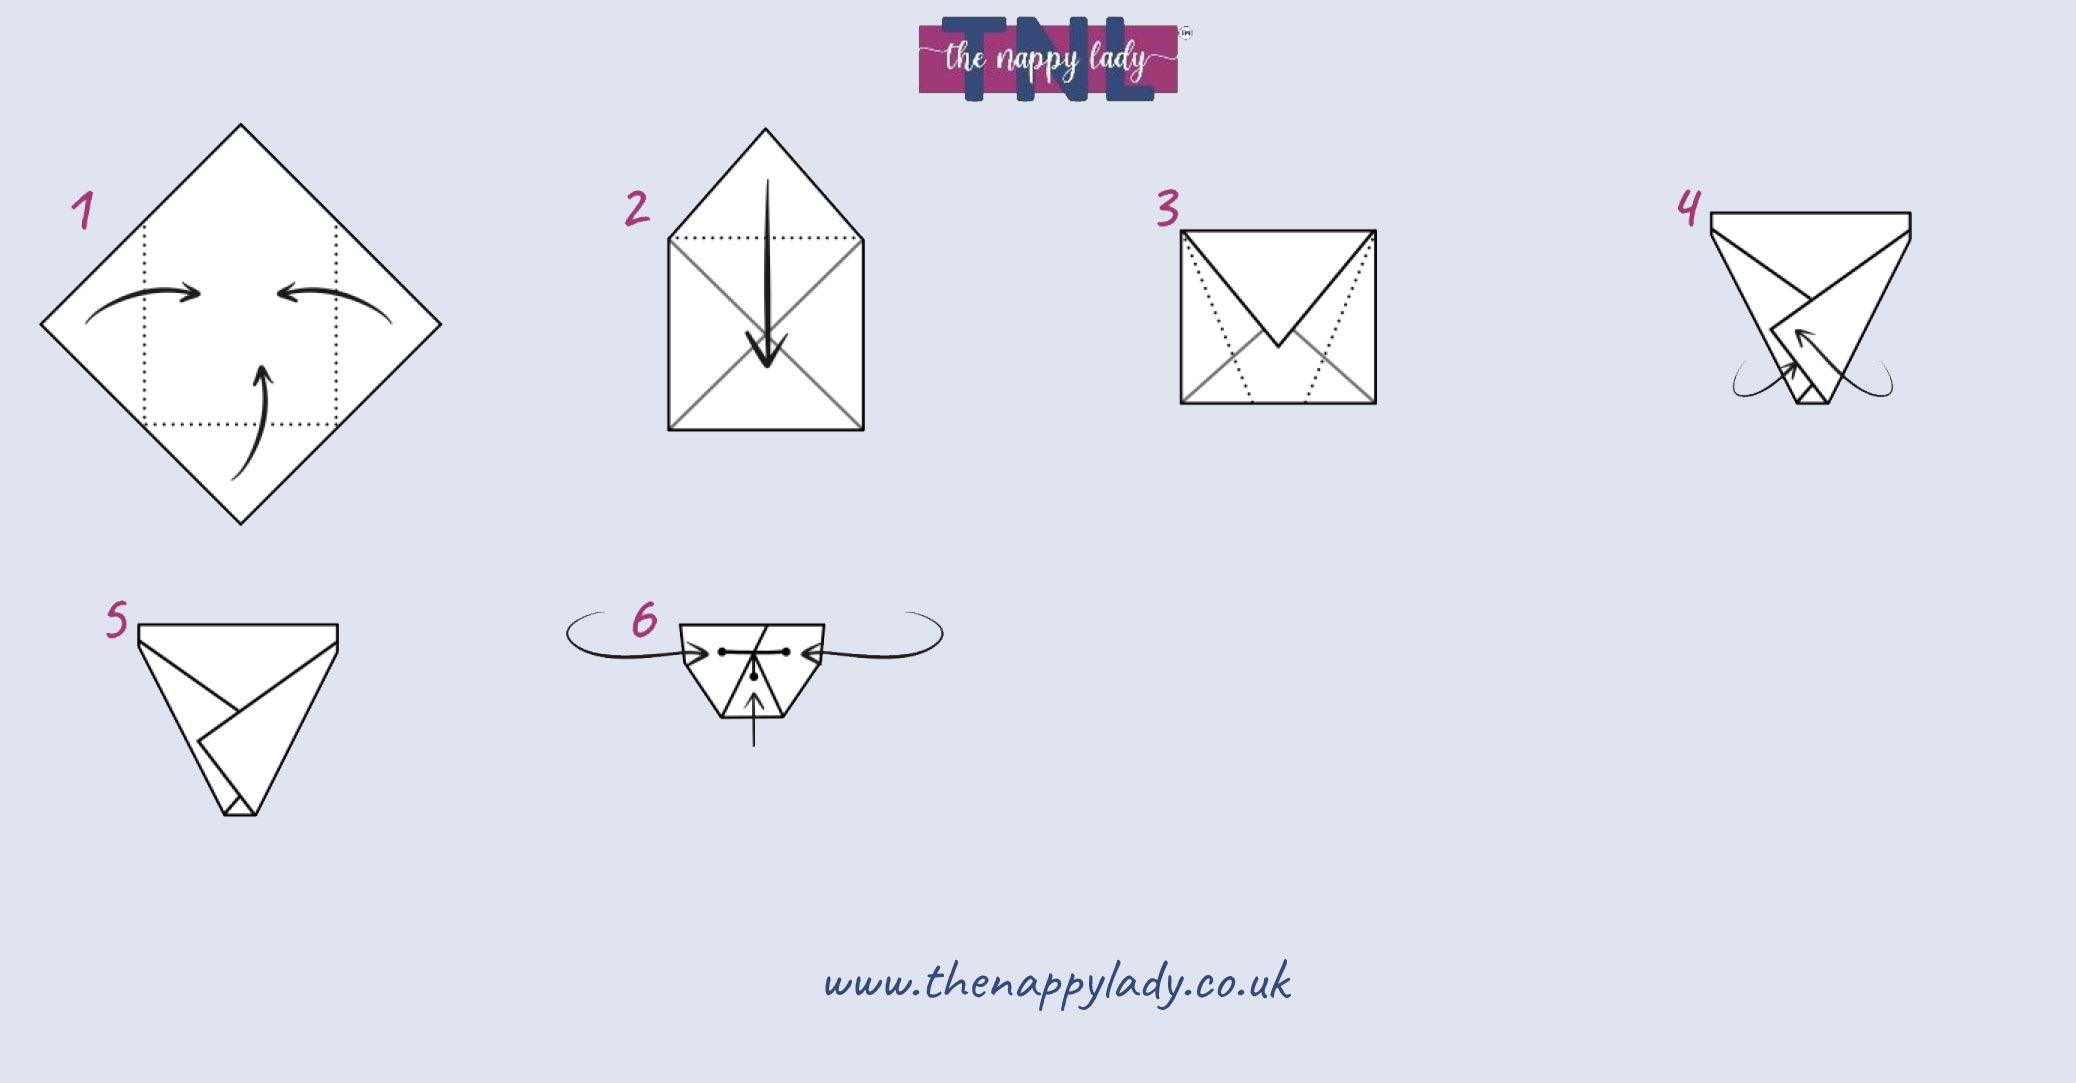
Terry Square V Fold
Very simple, and you end up with what looks like a 'V' shape, hence the name.
- Lay the terry out in a square and then fold the bottom and left and right corner in to meet at the centre.
- Fold the top down to overlap the centre.
- Imagine lines from the top left and right corners to the bottom creating a V.
- Fold the bottom corners up towards the centre along these imaginary lines as shown in diagrams 3 and 4.
- Add the baby.
- Fold up the bottom, bring each side wing around the baby and fasten with a nippa. Tuck up any excess fabric on the legs.
Terry Square Triangle Fold
The largest and least absorbent of terry folds. Could be used to support a pad for night time use.
- Lay thus terry out in a square
- Fold the nappy in half, making a triangle.
- Turn it around so the long edge is along the back and triangle is pointing down and add the baby.
- Bring the centre up and the side wings around and fasten with a nippa. Tuck the legs in to reduce bulk and improve containment.
Terry Square Pad Fold
Good for older babies (4-5 months plus) used inside any gusseted wrap. Very absorbent, yet neat - no excess fabric over baby's hips. Excellent inside another shape folded terry as a mighty booster for an overnight nappy. May suit a boy best, as thicker fold is at one end.
- Fold over the top 1/3 (along a horizontal line).
- Fold the nappy (along the vertical line) into quarters or thirds depending on the width of nappy required.
- Place the pad directly into the wrap, works best with a wrap with an inner flap to hold the pad in place.
Terry Square Twist Fold
This is a very quick and easy fold, especially suitable if your child has a sore bottom which needs to be aired, wearing it without a wrap on top. Suitable for an older toddler, if they are quite reliable about pooing on the toilet or potty, as this fold won't offer much in the way of containment. If it's too long in the crotch, simply fold down the end towards you, before folding across in half.
- Fold the nappy in half.
- Twist the rectangle across the middle.
- Add the baby.
- Bring front up, sides across and fasten with nippa.
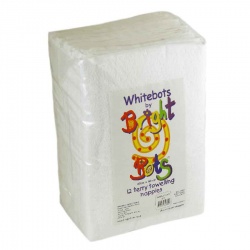
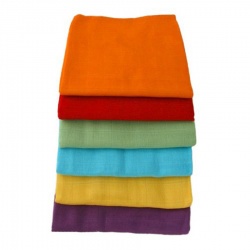
Excited to try terries? Find them here:
.jpg)
.jpg)
.jpg)
.jpg)
.jpg)

.jpg)
